In this post you'll discover why it's useful to consolidate data and see 2 different ways to use Excel's Consolidation tool.
1. Why do you need to consolidate data?
There are many situations where you need to summarise or gather data from a number of different worksheets. For example, if monthly data was stored on separate worksheets, you may wish to total up the figures from each worksheet into a new quarterly worksheet.
If all else fails you could copy and paste data, although this introduces many problems.
It is not difficult to create formulas which collect the relevant data. However, when the data comes from different sources (e.g. different people, departments or branches) there is often data missing or a table may have a different layout or be in different positions with a worksheet. This slows down the process of creating the correct formulas.
Excel provides a neat feature called Consolidation. It can be used in two ways:
2. Consolidate data by position

When every worksheet has an identical layout, you can consolidate data by position. It doesn’t matter if the column headings or row labels contain slightly different spellings as this method works only on the position of the data.
To consolidate data:
1. Either select the whole range of empty cells that will house the consolidated data, or simply select the upper-left cell of the range.
2. Select the Data tab.
3. Click the Consolidate icon on the Data Tools group.
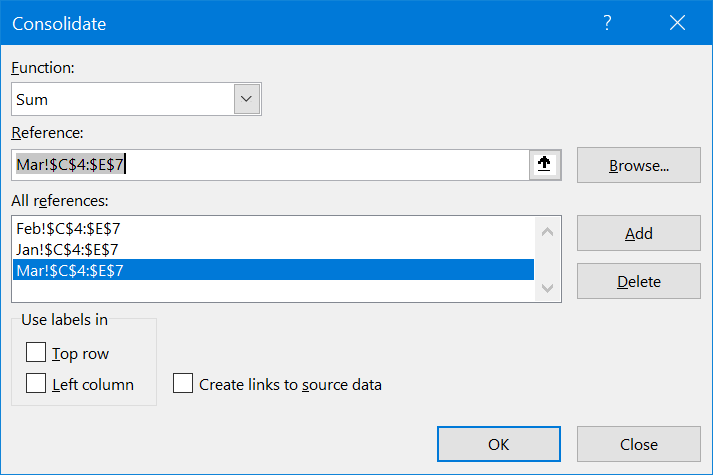
4. Choose what to do with the data by selecting a function from the list. The default is SUM.
5. Position the cursor in the Reference box.
6. Select the worksheet and range of the first set of data to be consolidated.
7. Click Add
8. Rinse and repeat for any additional ranges to be consolidated.
9. Leave the Top Row and Left Column boxes un-ticked.
10. Choose whether or not to create a link to the source data.
11. Click OK.

The consolidated data has been inserted into the original data range that was selected.

If the Linked box is ticked in the Consolidate dialog box, then the source data is pulled through and then manipulated (i.e. SUMMED or whatever function you choose).

3. Consolidating data by matching labels

When the data that you want to consolidate does not have a consistent format, you can consolidate data by matching labels instead.
This method works by matching the olumn headings and row labels of the summary table with the ranges being consolidated. When Excel finds a match, the data is consolidated.
While position is not relevant, the labels themselves are. In order to find a match, the labels must have matching spelling and capitalisation. Labels do not have to be in the same order within the table and some worksheets may omit a label altogether. Where Excel finds a match, it will use the data.
To consolidate by category, the process is largely the same as consolidating by position, with a few key differences:
1. On the summary sheet, select the cells that will house the consolidated data. You must include the row labels and column headings.
2. Select the Data tab and click the Consolidate icon.
3. Choose a function. The default is SUM.
4. Place the cursor in the Reference box, if necessary.
5. Choose what to do with the data by selecting a function from the list. The default is SUM.
6. Position the cursor in the Reference box.
7. Select the worksheet and range of the first set of data to be consolidated.
8. Click Add
9. Rinse and repeat for any additional ranges to be consolidated.
10. Tick the Top Row box and the Left Column box.
11. Click Ok

4. Key Takeaways
I hope you found plenty of value in this post. I'd love to hear your biggest takeaway in the comments below together with any questions you may have.
Have a fantastic day.


About the author
Jason Morrell
Jason Morrell is a professional trainer, consultant and course creator who lives on the glorious Gold Coast in Queensland, Australia.
He helps people of all levels unleash and leverage the power contained within Microsoft Office by delivering training, troubleshooting services and taking on client projects. He loves to simplify tricky concepts and provide helpful, proven, actionable advice that can be implemented for quick results.
Purely for amusement he sometimes talks about himself in the third person.
SHARE

