As your document grows it becomes harder to manage and it makes sense to break it into smaller chunks.
Think about how a regular book is divided into chapters or sections. In Word, you can create a master document which acts as a container for all its sub-documents.
The computer can process the document faster, different contributors can work on different documents at the same time, maintenance is faster, and styling can be controlled centrally from the master document.
This post walks through how to set up a master document using the INCLUDETEXT field.
1. What does a master document look like with INCLUDETEXT fields
Here is one of my training manuals which weighs in at 148 pages.
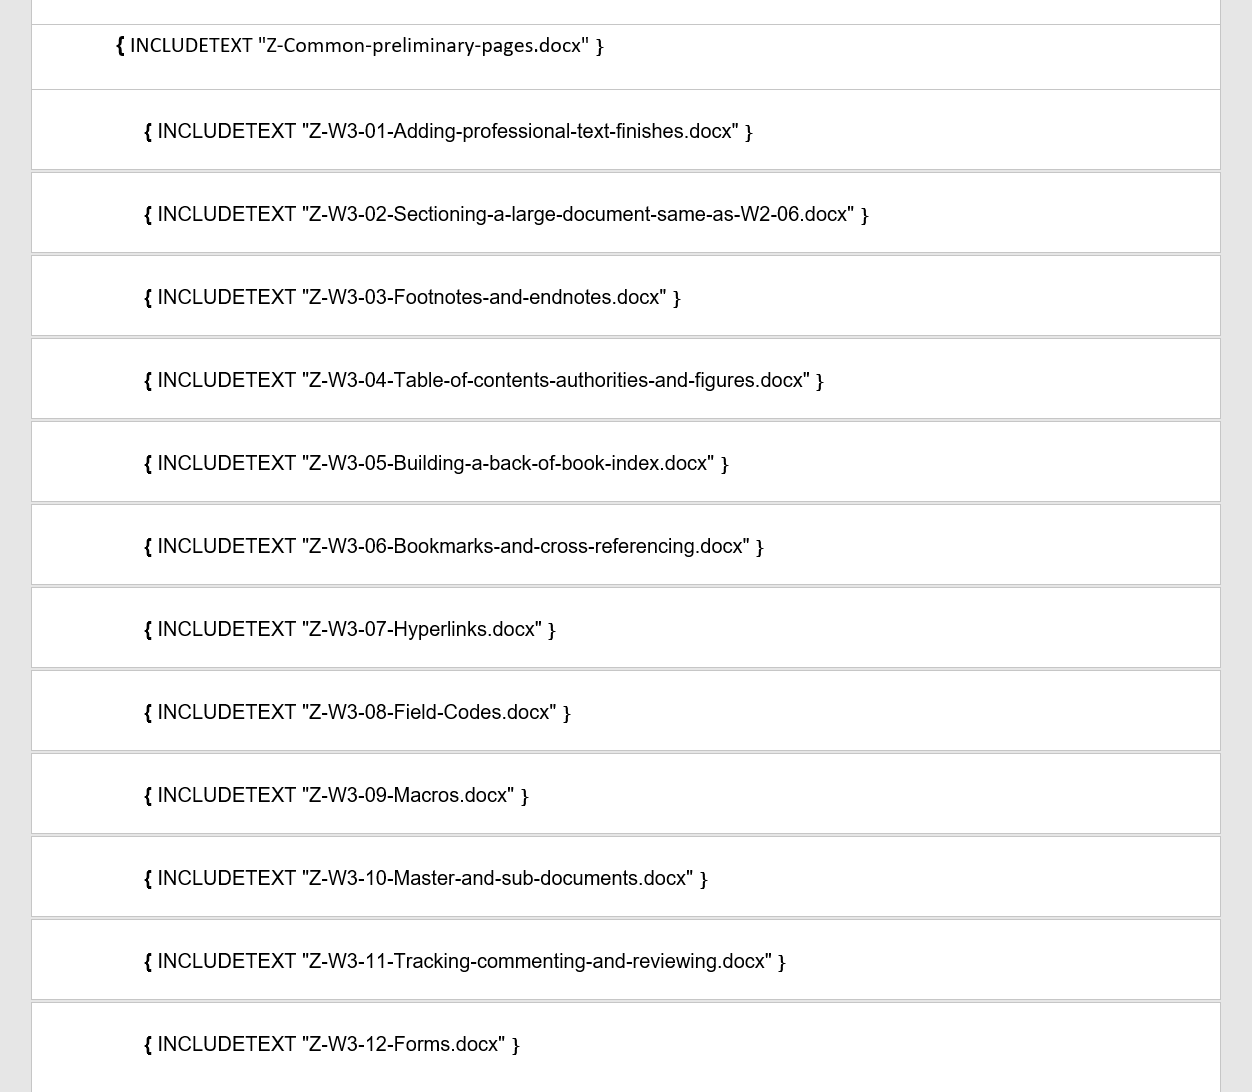
The whole manual can be condensed into this.

Each INCLUDETEXT entry points to a different chapter. Each chapter is a document stored in the same folder as the master document.
The single line between the first two INCLUDETEXT entries represents a page break so the content on the second subdocument continues on the page directly after the first subdocument.
The double line between the second and third INCLUDETEXT entries represent a section break. For consistency, I always start a new chapter on the next odd page (the right-hand page on a 2-page spread), regardless of whether the current chapter finishes on an odd or even page.
Clicking the pilcrow icon (the one that looks like a backward P) on the Home ribbon, reveals the hidden formatting and clearly shows what kinds of break exist between each INCLUDETEXT field.

And to remove the white space to get the condensed view:
1. Click on the gap between two pages to set the focus.
2. Double-click again to remove or add the white space.

2. How to insert an INCLUDETEXT field
Fields are always enclosed with braces { }. You cannot simply type these. Rather you must press Ctrl F9 or insert a field from the Quick Parts feature.
1. Click the Insert tab.
2. Click the Quick Parts icon on the far-right side of the Insert ribbon.

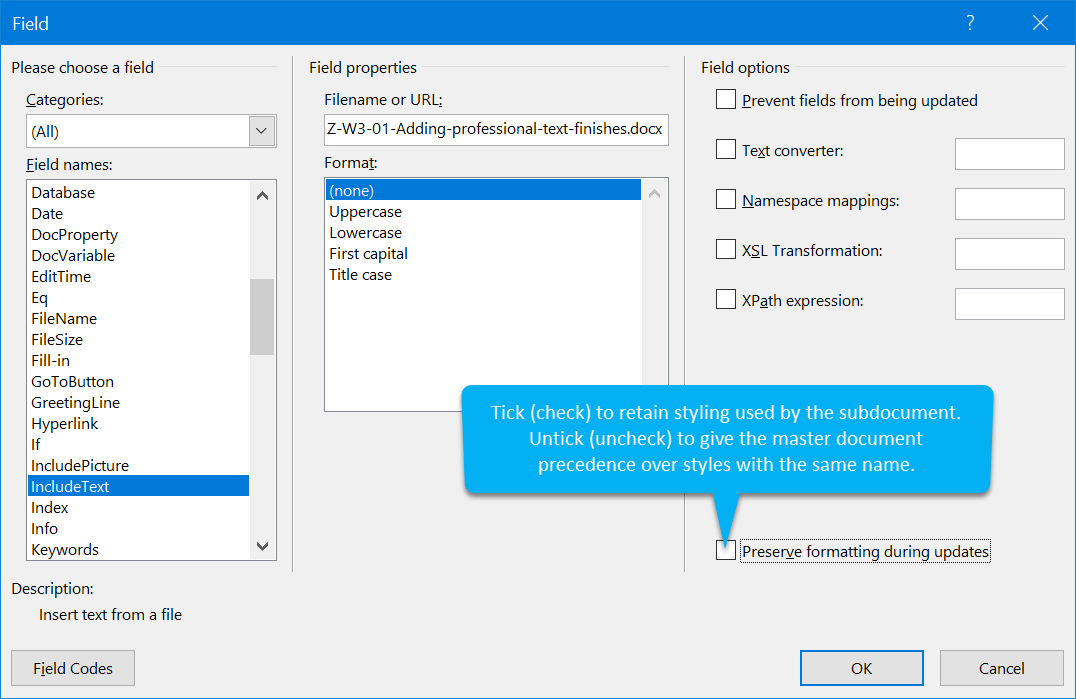
3. Select Field towards the bottom of the menu. The Field dialog is displayed.

4. From the Field Names list, choose INCLUDETEXT.
5. In 99% of cases the default field options can be left.
6. However, the Preserve Formatting During Updates checkbox could be important.
3. How to toggle the INCLUDETEXT field with its content
To toggle one INCLUDETEXT field to show the subdocument content (or vice versa):
1. Place the cursor inside the braces. Grey shading will appear behind the text. This tells you that Word controls the content, not you!
2. Press Alt F9.
To toggle all INCLUDETEXT fields to show the subdocument content (or vice versa):
1. Press Ctrl A to select the entire document content.
2. Press Alt F9.
4. Update subsequent changes to a sub-doc in the master doc
To toggle all INCLUDETEXT fields to show the subdocument content:
1. Press Ctrl A to select the entire document content.
2. Press F9.
So there you have it. An easy way to create a master document and subdocument setup.
There are 74 fields to explore in the Field dialog too. That will keep you busy for a while!
I hope you found plenty of value in this post. I'd love to hear your biggest takeaway in the comments below together with any questions you may have.
Have a fantastic day.


About the author
Jason Morrell
Jason Morrell is a professional trainer, consultant and course creator who lives on the glorious Gold Coast in Queensland, Australia.
He helps people of all levels unleash and leverage the power contained within Microsoft Office by delivering training, troubleshooting services and taking on client projects. He loves to simplify tricky concepts and provide helpful, proven, actionable advice that can be implemented for quick results.
Purely for amusement he sometimes talks about himself in the third person.
SHARE


Is there a way to get Word to automatically update Include Fleder before printing? I have the same include in many documents and would like to avoid having to manually update each document after changing the include. On the one hand, this would save time and, on the other hand, avoid forgetting a document and printing out outdated information.
Yes. Press Ctrl A to select the whole document then press F9 to update everything.
Depending on your keyboard setup you may need to press Fn F9.
I’m curious if there is a way to comment on specific text that is added to a document using the INCLUDETEXT field without commenting on the originating document from which this text is drawn. Currently, when I comment, the entire text block is referenced and the comment appears all the way at the top. This is problematic if the text block is several pages long.
The idea of INCLUDETEXT is to insert completed subdocuments, lock, stock and barrel.
Any subsequent comments added to the actual sub-document will appear in the master document, once the INCLUDEFIELD is updated.
However, any comments (or replies to comments) made to the subdocument content from within the master document are not saved, so you will lose them once the master document is closed.
An alternative approach is to use the *master and sub-document approach* which allows you to add or reply to comments from within your master document or in the open sub-document.
https://officemastery.com/master-document-multiple-subdocuments-word/