In this post, I'll share how to build a dynamic Microsoft Word index (i.e. one you can update automatically without having to rebuild it) using a concordance file.
A concordance provides several benefits over using the Mark & Index method that most people use:
1. Quick snapshot
A Word Index (example shown below) provides a very useful reference for the reader.
Unlike a structured table of contents where the reader scans a general list of topics until they find a one of interest), a Word index allows the reader to search for a specific word or phrase, normally in alphabetical order and go straight to the relevant page (or pages).

There are two steps for generating an index.
First, ‘mark’ the items you want to appear in the index (from the concordance). Then, you compile the index, using the marked entries.
Every entry that is marked has an XE field code inserted immediately after it, like this:
{ XE “index entry text” }
XE stands for Index Entry.
Word switches hidden formatting on as soon as you mark an entry so it doesn't take long before your document starts to look messy. But don't worry - when you print your document, field codes are not printed.

As your Word index grows, the benefits of a concordance file become clear.
(This alternative post covers how to build a Word index using the Mark & Index method)
2. How to create a Word index using a concordance file
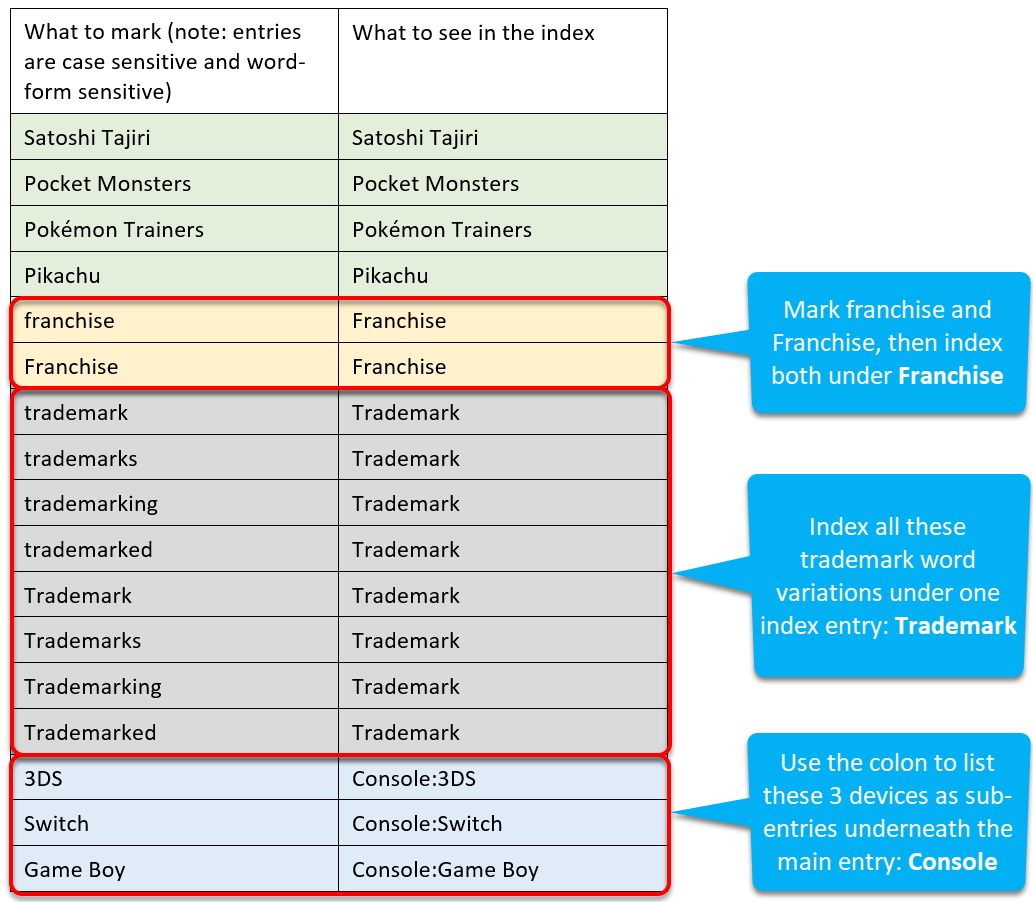
Many editors use a concordance file to generate an index for a document. A concordance file is a two-column table that is created in a separate document.

Step 1: Mark entries within a Word document using the pre-prepared concordance file
1. Select the References tab.
2. Click the Insert Index icon in the Index group.
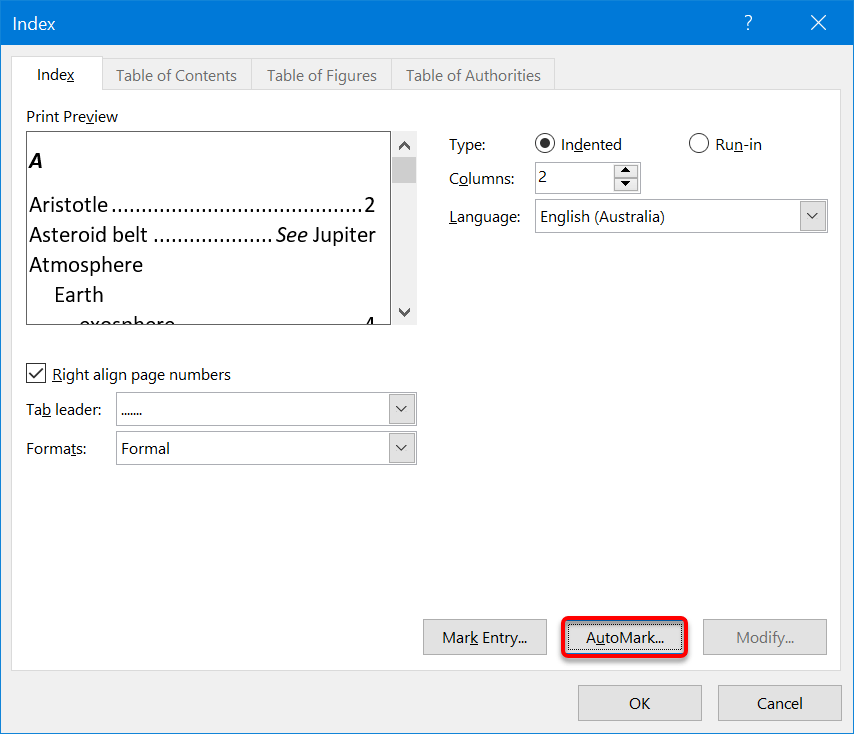
3. Click the AutoMark.. button.

4. Locate and select the concordance file and click OK.
All entries within the main document are now marked.
Step 2: Create the index
1. Select References | Insert Index again to display the Index dialog.

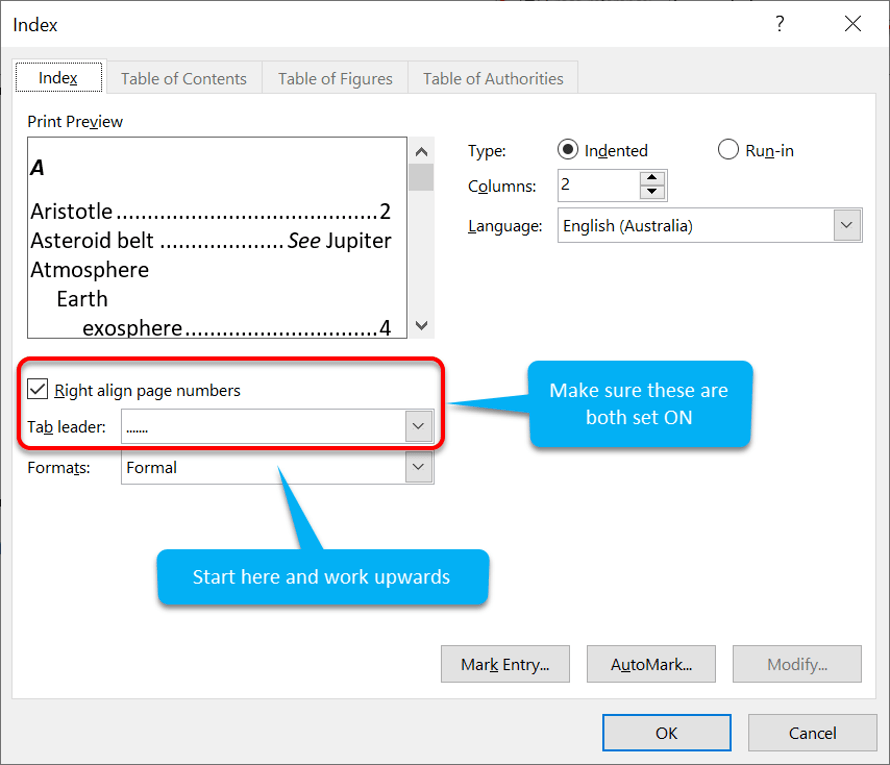
2. Choose a Format from the drop-down list. Be aware that different formats select, deselect or change some of the other options in the dialog. The safest approach is to start at the bottom left and work upwards, then to the right.
3. Ensure that Right-align page numbers is selected.
4. Select a tab leader (the tab leader fills the gap between the end of the item and the page number - dots work best).
5. Choose whether to use Run-In or Indent (watch the preview).
6. Choose how many columns to display in the index.
7. Click OK
Step 3: Update the concordance and/or index (when needed)
1. Open the concordance file, make your changes and save the file.
For accuracy, it's best to clear the current XE codes from the main document. This allows the index to be updated with no loose ends and caters for items that have been added, changed or removed from the concordance.
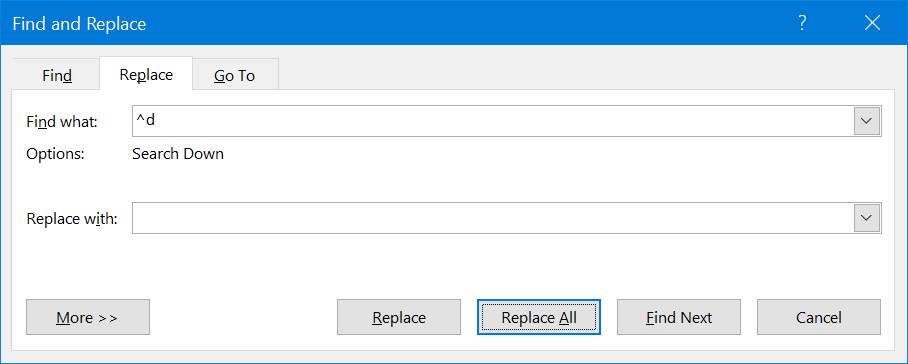
2. Press CTRL H to display the Replace dialog. Alternatively, click the Find & Select icon on the far-right side of the Home ribbon, then choose Replace.
3. In the Find box, type ^d XE (press SHIFT 6 to get ^).
^d is a special character that finds braces (curly brackets) that enclose field codes. Many field codes can be used in Word. Using ^d by itself removes every field code from the document. ^d XE removes only the XE field codes.
4. Leave the Replace box empty.

5. Click Replace All (or Find then Replace to process one by one).
And finally, re-mark and refresh
6. Select References | Insert Index | Automark.
7. Click on the existing index to display the grey shading.

8. Press F9 to refresh the index.
Alternatively, right-click and choose Update Field from the context menu or click the Update Index button on the References ribbon).
3. Key Takeaways
And that, my friend, is how you build an index page in Word (using a concordance) with no loose ends.
4. What Next?
I hope you found plenty of value in this post. I'd love to hear your biggest takeaway in the comments below together with any questions you may have.
Have a fantastic day.


About the author
Jason Morrell
Jason Morrell is a professional trainer, consultant and course creator who lives on the glorious Gold Coast in Queensland, Australia.
He helps people of all levels unleash and leverage the power contained within Microsoft Office by delivering training, troubleshooting services and taking on client projects. He loves to simplify tricky concepts and provide helpful, proven, actionable advice that can be implemented for quick results.
Purely for amusement he sometimes talks about himself in the third person.
SHARE


Hi Jason,
Your explanation is fantastic. I’m having an issue now where I have 2 instances of a play (called Him!) but from different years by different directors, so would like them separated in the index. Is there any way to differentiate them?
Thanks,
Ryan
Hi Ryan. You cannot separate them using a concordance but you can simply insert a manual entry for each occurrence in the form { XE “Him!, Bloggs, Joe, 1969” }, { XE “Him!, Jones, John, 1938 } etc.
Best results come from using an index for the bulk of your indexing then manual insertions for the anomalies and special cases.
Hi, Jason. Thanks for this great teaching. I’m using Palatino Linotype for my main font, and with that I cannot remove the existing XE field codes using ^d character in the Find and Replace tool. Do you know why? Is there a workaround for this so I can update the Index?
Hi Lucia
The font you use should have no impact on clearing the field codes, which will always start with ‘{ XE’, so I’m not sure why that doesn’t work for you. Make sure that your Show/Hide icon is switched on, so you can see the hidden field codes. Without the Find and Replace tool, your only option is to go through the document menually. Sorry!
Sorry for the late response. For some reason my site didn’t notify me of this comment.
Thank you, Jason – that was nicely simplified. I have made a concordance file, but when I make the Index, it lists pages from the endnotes, the acknowledgements and the bibliography as well as the main text. How can I make it only include pages from the main text? Thanks!
Hi David. First, you need to bookmark the area that you wish to index then tell the index to only look at your bookmarked range. Here is the process:
Let me know how you go.
Hi Jason … thanks for this excellent guidance through setting up a Concordance populated Index. I’ve done it before but had forgotten the logic.
I need to do do it repetitively so I turned your logic into some VBA code (which I drive from a project module and form in Outlook VBA) .. wdAP is a Word object created in VBA, ticking the tickbox control optWdIndex either just gets rid of all marked index entries, or does that and then proceeds to rebuild it from the current concordance file
Thanks again, the code is below for anyone interested, John
Private Sub optWdIndex_Change()
‘——————————————————————————————————–
‘if there aren’t any indexes in the document
If wdAP.ActiveDocument.Indexes.Count = 0 Then beep: Exit Sub
‘———————————————————————————————————
‘first part gets rid of all existing marked index fields
‘in the first Index in the active document in wdAP
‘———————————————————————————————————
wdAP.ActiveDocument.Indexes(1).Range.Select
CursorPosition (True)
With wdAP
.ActiveWindow.ActivePane.View.ShowAll = True
.Selection.Find.ClearFormatting
.Selection.Find.Replacement.ClearFormatting
With .Selection.Find
.Text = “^d XE”
.Replacement.Text = “”
.Forward = True
.Wrap = wdFindContinue
.Format = False
.MatchCase = False
.MatchWholeWord = False
.MatchWildcards = False
.MatchSoundsLike = False
.MatchAllWordForms = False
End With
.Selection.Find.Execute Replace:=wdReplaceAll
End With
‘———————————————————————————————————
‘only proceed here if index is to be recreated
‘———————————————————————————————————
If optWdIndex.Value = True Then
With wdAP
.ActiveDocument.Indexes.AutoMarkEntries ConcordanceFileName:= “C:Index.docx”
.ActiveWindow.ActivePane.View.ShowAll = False
.ActiveDocument.Styles(“Index 1”).Font.Size = 12
.ActiveDocument.Styles(“Index 2”).Font.Size = 12
End With
End If
Thanks for sharing John.
Jason,
I’ve examined explanations of this topic and, they have all been helpful to a point, yet incomplete. They simply did not aid in the overall understanding of how this works, why things are done in a certain order and how to update the table. Your explantion is excellent! The best I’ve seen.
I have a question:
Do we need two Section markers at the end of the document for the Index?
Regards,
JD
Hi James
Thank you for your kind words. Word inserts the continuous section breaks before and after the index. They are required to allow the index to have independent settings such as a chosen number of columns and tab positioning without impacting the rest of the document.
Jason
OK, I can buy that!
Since we’re on the subject – perhaps a question closeer to my heart.
I’d like to generate hyperlinks via an Automarked Index.
I’d like to use field codes in the Automark Concordance file to specify the “text” and “‘book mark” and have MS Word generate a hyperlink to the exact location in the document.
However, I’ve yet to find documentaion on the subject. Does it exist? Or we talking VB here?
Love to hear your thoughts.
JD
This is not possible using the standard feature set, but most things are possible with VBA. Check out upwork.com or freelancer.com. It’s better to pay a developer for a couple of hours of their time than spend a week or more trying to work it out for yourself!
Sound advice and great tips.
Thanks!
JD
Thank you James. I appreciate the kind words.