If you are an absolute beginner with Microsoft Word, the screen can be very confusing.
In this post you'll be given an express tour of the Word screen, shown the key components to look out for and introduced to the 'lingo' (terminology) that is used.
1. What does Microsoft Word do?
Word is a powerful tool that allows you to create and manipulate business or personal documents. Whether you need a one-page letter, a 200-page report or want to create a fun flyer or newsletter, Word provides the tools you need.
You can format text by changing attributes like the style, the size and the colour. You can emphasise text by making it bold, italic (slanted) or by underlining it.
You may change the spacing and positioning of the text or add a header or footer which appears on every page.
Spelling mistakes can be easily identified, then rectified.
When you are comfortable with the basics, you can convert a solid page of text into several columns of text (like a newspaper), add pictures, diagrams or drawings, create tables of data, make cross-references to other parts of the document, add a table of contents or build a back-of-book index. Some of this is covered in this course. The more advanced features are not.
Because of its versatility, ease of use and functionality, Microsoft Word is the program of choice for individuals, small businesses and large companies across the world.
2. Key components of the Word screen
» Bird's eye view
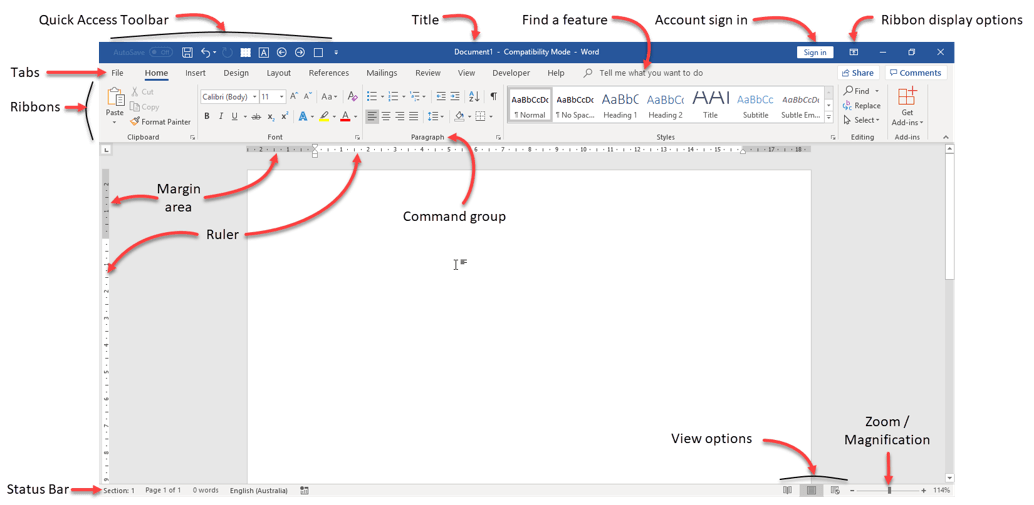
The annotated screenshot provides a birds eye view of the Word screen. Each of these components are broken down and explained in the next section.
» Quick Access Toolbar (QAT)

The Quick Access Toolbar sits in the top-left corner of the Word screen. It contains one-click access to features that YOU might use often and avoids the need to hunt down a tool amongst all the toolbars that are available.
The default icons are Autosave (on or off), Save, Undo and Redo, but you can add your own icons to suit the way you work.
» The command centre
At the top of the Microsoft Word screen is the command centre, a large array of tools that give you access to everything Microsoft Word has to offer.
The command centre comprises tabs, ribbons, command groups and commands (icons).
» Tabs and ribbons
Every Word tool is organised into TABS and RIBBONS. Each ribbon can be selected by clicking its TAB.
Each ribbon has groups of related tools that follow a particular theme or purpose.
The HOME RIBBON contains the most commonly used tools, whatever level you're at. This is true of every program.

The next tab, INSERT contains commands for inserting different elements into the document, such as tables, pictures and other graphic objects.

Another tab, LAYOUT, contains commands for setting up the printed page, such as the paper size, margin sizes and page orientation.

You get the idea.
You’ll learn how to use some of these commands as you go through this course.
As a beginner, most of what you need is on the HOME TAB/RIBBON, so you shouldn’t have to venture too much further to find what you need.
» Command groups and commands (icons)
Commands (icons) are organised into groups. Group names appear at the bottom of the ribbon and are separated by vertical dividers.
Command groups contain a collection of related tools.
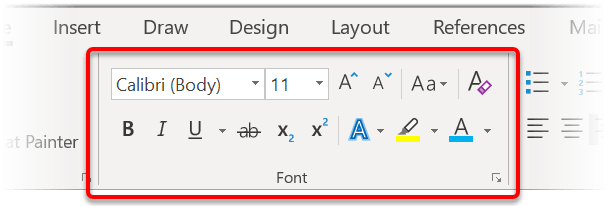
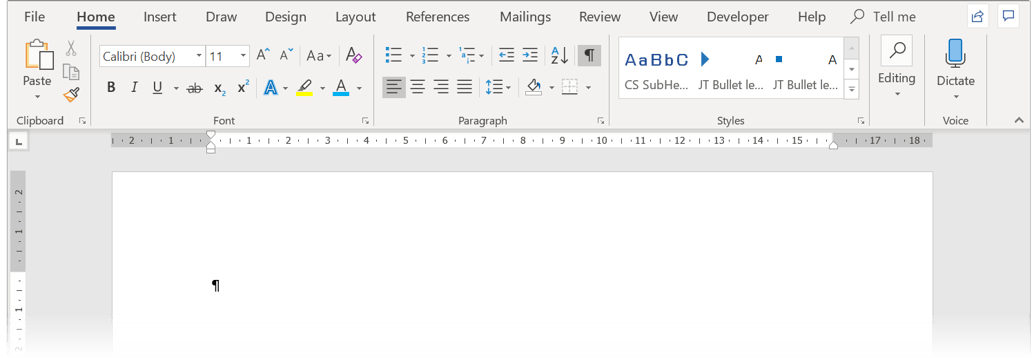
If you look at the HOME RIBBON, you'll see command groups called Clipboard, Font, Paragraph, Styles, Editing and Add-Ins.
Faint vertical dividers are used to separate each command group.

On the HOME RIBBON, the FONT group contains options to change the font, font size and colour, set bold, italic and underline, and more.
» How screen size affects the commands you see
Icons can be different sizes and may or may not has a text description next to them.
For example, the PASTE icon (right) is large while the CUT, COPY and FORMAT PAINTER are small.
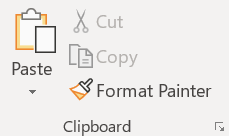
Microsoft Word uses smart technology to detect what size screen you are using and adapts the icons to best fit the size of your screen.
If you are using a big screen (e.g. a 27” or 32" monitor), then there is adequate space to display icons at their full size.
However, if you are using a laptop or tablet device which has a small screen then the icons will be compacted to fit the space, and some may also lose their text descriptor.
» Screen tips
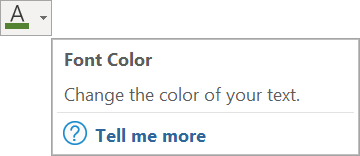
A screen tip is a floating box that appears when you hover over a command icon.
It tells you the function of the icon, i.e. what will happen when you click the icon.
» The printed page
The white page is laid out against a light-grey background, a bit like placing a blank page on a table top.
A large monitor often has the space to display the whole of an A4 vertical page on the screen. Sometimes you can display 2, 3 or more full-size pages side-by side on one screen.
On laptops or smaller screens, you will only see the top section of the page and you need to scroll down with your mouse to see the rest of the page.
A flashing vertical marker indicates where text will appear when you start typing
» Rulers, measurements and margin areas
A vertical ruler is displayed down the left side of the page and a horizontal ruler is displayed across the top of the page.
Measurements can be displayed using the metric system (cm) or the old imperial system (inches).
The grey section of the rulers show the margin area. These sections of the page cannot be typed into unless you are specifically editing the header or footer
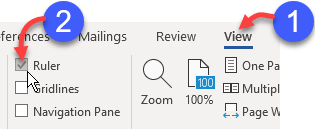
To turn the ruler on or off:
1. Single-left-click the VIEW tab.
2. Tick the RULER tick box to show the ruler
3. Untick the RULER tick box to hide the ruler.
» Status bar
At the bottom of the Word window is the STATUS BAR.
The left side of the status bar can display all kinds of information about your document.
The example above shows the section number (chapter), page number, total number of pages, the word count, a spell check icon and the language used for the spell checker.
» 3 view icons
On the right side of the status bar, there are 3 view icons. The middle icon is the only one you'll need as a beginner.
» Zoom / magnification
In the bottom-right corner of the Word window is the ZOOM control.
To change the magnification of your document
Changing the zoom percentage DOES NOT change the size of the text when you print out your document. It simply allows you to get a closer look or pull out for a bird's eye view.
» Sign in
In the top-right corner of your Word window is a SIGN IN button. This will sign you into your Office 365 account so you can change your settings, if needed.

» Ribbon display options
Also, in the top-right-corner of your Word window are the RIBBON DISPLAY OPTIONS icon.
Single-left-click the icon to display 3 options.
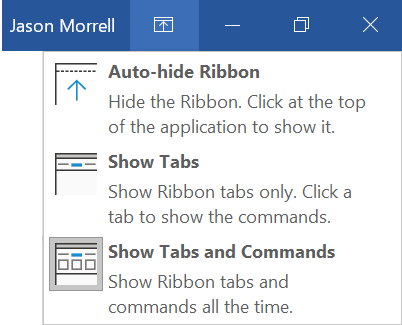
The default option is option 3: SHOW TABS AND COMMANDS. You can see all the tabs and the currently selected ribbon

The second option, SHOW TABS, only hides the RIBBON while you are editing your document.
To display the ribbon again, single-left-click a TAB. But remember, when you click back on your document, the ribbon will be hidden again

The third option: AUTO-HIDE RIBBON hides the tab row and the ribbon as well as the title bar and the status bar at the bottom of the screen to give you the most possible screen space for your document content.
This is useful is you are working on a small screen

To redisplay the tabs and ribbons
1. Move the mouse pointer to the top edge of the screen until the blue Word title bar appears.
2. Single-left-click the blue bar.
3. Single-left-click either SHOW TABS or SHOW TABS AND COMMANDS.
3. All the key points again
4. What Next?
I hope you found plenty of value in this post. I'd love to hear your biggest takeaway in the comments below together with any questions you may have.
Have a fantastic day.


About the author
Jason Morrell
Jason Morrell is a professional trainer, consultant and course creator who lives on the glorious Gold Coast in Queensland, Australia.
He helps people of all levels unleash and leverage the power contained within Microsoft Office by delivering training, troubleshooting services and taking on client projects. He loves to simplify tricky concepts and provide helpful, proven, actionable advice that can be implemented for quick results.
Purely for amusement he sometimes talks about himself in the third person.
SHARE

