
This post is all about using SUM.
When you are working with a lot of data, creating formulas manually is time consuming.
SUM makes your life much easier and makes formulas quicker and more accurate by reducing errors.
1. Using Excel Functions
Excel has over 450 pre-programmed functions. The simplest one that everybody learns first is SUM. SUM adds things up.
At the other end of the spectrum, the top-end functions are used by statisticians, mathematicians, engineers and scientists and tend to be quite specialised. However, there are still many that can be used by ‘ordinary’ folk!
A function is used within a formula to simplify it.
For example,
=A1+B1+C1+D1+E1+F1+G1+H1
can be replaced with
=SUM(A1:H1)
This is easier to read and easier to maintain.
To see the full benefit, scale it up. Imagine if you had to add up 25 cells. Or 1,000 cells!
Excel even does the hard work of setting it up for you. You are given a tool called AutoSum.
2. Using AutoSum
The AutoSum button is ideal for novices who wish to learn and use some simple Excel functions. The AutoSum button provides a list of the five basic functions – SUM, AVERAGE, COUNT, MIN and MAX. The icon is the Greek Sigma symbol and looks like a sideways ‘M’ or a crooked ‘E’ (see below).
Using Autosum is quick and easy.
1. Select the numbers to be added and the blank cell either to the right or underneath the selection.
2. Click the Formulas tab.
3. Click the AutoSum icon.
A SUM function is created in the blank cell (the last cell of your selected cell range). The selected cells are added together and the total is calculated.
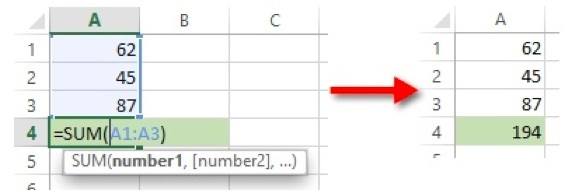
Figure 02: AutoSum creates a SUM function in the first blank cell after the data
3. How the SUM function works
By default the AutoSum tool creates a SUM function, which adds together the values in the selected cells. To see what the SUM function looks like, click on the cell that contains the total and study the formula bar.
The SUM function may be typed directly into a cell, rather than using AutoSum. This is quicker for experienced users.
Figure 03: The SUM function in the formula bar
Here’s the process to use once you’re a bit more confident:
1. Select the blank cell where the total will be calculated (this is often - but not always - directly underneath the main data, or directly to the right of the main data).
2. Type ‘=SUM(’
3. With the mouse, select the range of cells you want to add up. Never type in the cell or cell range by hand.
4. Type the closing bracket.
5. Press Enter.
The structure of a SUM function is =SUM(number1, number 2 …) where each number may be a constant (e.g. 5), cell reference (e.g. A1) or cell range (e.g. A1:A3).
- Every item within the brackets is added up.
- Number1, number2 etc. are called arguments. A SUM function may have up to 32 arguments, each separated by a comma.
- The function is preceded with ’=’ (as for formulas).
- The notation for a range – two cell references with a colon (‘:’) in-between.
The following formulas are valid examples of the SUM function.
=SUM(1,2,3)
=SUM(A1,A2,A3)
=SUM(A1:A3)
=SUM(1,A1,A5:Z10)
4. Five different ways to start using AutoSum
#1 Select a single blank cell
1. Select the blank cell underneath the data.
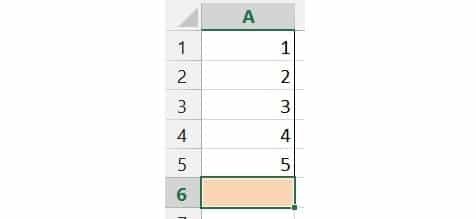
Figure 04: Using AutoSum by selecting the blank cell underneath the data
2 . Click the AutoSum icon.
3. Excel looks around the blank cell and if it finds data it will display the data range in the formula.
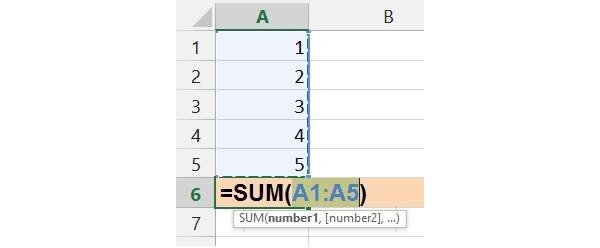
Figure 05: AutoSum guesses the data range to use and asks you 'Is this data range correct?'
4. If the data range is correct, press Enter to confirm the formula.
#2 Select the data (and the blank cell - optional)
1. Select the data you want to add up.
2. Optional - you can also select the blank cell underneath - or not. Your choice.
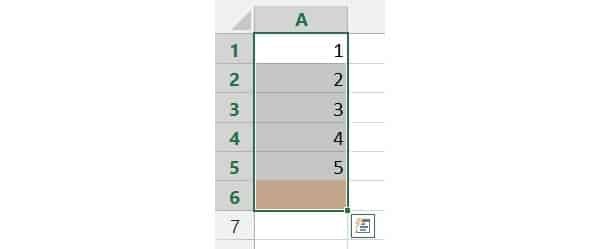
Figure 06: Using AutoSum by selecting the all the data cells and the blank cell underneath the data
3. Click the AutoSum icon. The total is added automatically.

Figure 07: AutoSum calculates the answer based on the data you selected and puts the total straight into the last cell
#3 Use methods #1 or #2 across the worksheet

Figure 08: AutoSum works across the worksheet as well
#4 Select 2 or more blank cells
When you select more than one blank cell going across the sheet, Excel knows that you want to add up columns of data, so it doesn’t ask you and puts the total straight into the cells.
1. Select 2 or more blank cells underneath the data
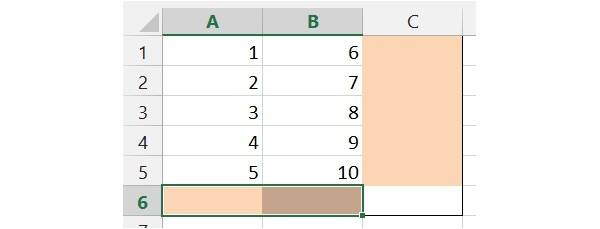
Figure 09: When you select more than one blank cell going across the sheet, Excel knows that you want to add up columns of data, so it doesn't ask you and puts the total straight into the cells
2. Click the AutoSum icon. The column totals are inserted automatically.
3. Select 2 or more cells to the right of the data.
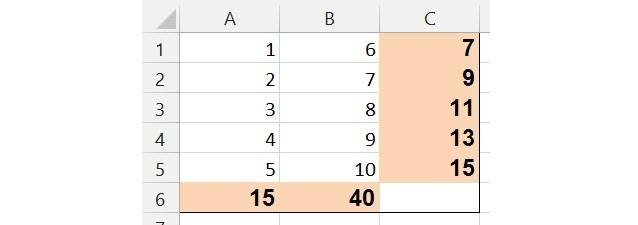
Figure 10: Row totals are inserted automatically
5. Click the AutoSum icon. The row totals are inserted automatically.
#5 Select all the data plus a blank column and/or row
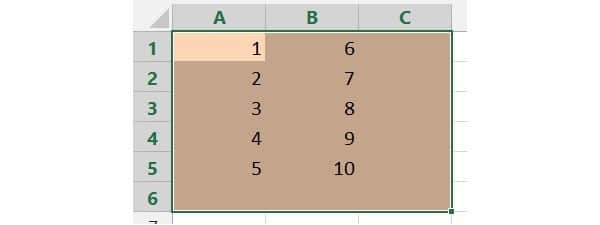
Figure 11: Select all the data, plus a blank row and a blank column to generate all the column totals and row totals in one hit
And when you click AutoSum, all the totals are generated in one hit. Imagine how much time you could save if you have 50 columns and 1,000 rows
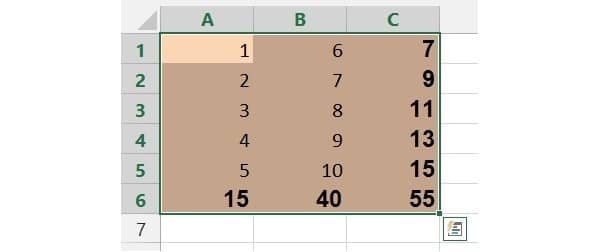
Figure 12: There you go! Imagine how much time you could save if you have 50 columns and 1,000 rows
5. Watch the video (over the shoulder demo)

6. What next?
I hope you have seen how useful, how easy and how versatile the SUM function is.
Knock up a simple spreadsheet, enter some data - whatever you like - and use the AutoSum to generate some totals quickly.
Once you’re confident doing that, try selecting a blank cell and creating a SUM function manually, by typing it directly into the cell.
In part 3, I discuss 4 other basic formula functions that are also useful and easy to use - AVERAGE, MAX, MIN and COUNT.
What do you think?
I hope you found plenty of value in this post. I'd love to hear your biggest takeaway in the comments below together with any questions you may have.
Have a fantastic day.


About the author
Jason Morrell
Jason Morrell is a professional trainer, consultant and course creator who lives on the glorious Gold Coast in Queensland, Australia.
He helps people of all levels unleash and leverage the power contained within Microsoft Office by delivering training, troubleshooting services and taking on client projects. He loves to simplify tricky concepts and provide helpful, proven, actionable advice that can be implemented for quick results.
Purely for amusement he sometimes talks about himself in the third person.
SHARE

