Multilevel numbering (also known as multilevel lists or sub numbering) is the #1 headache for many people working with large Word documents.
Believe it or not, it's not complicated. It just takes somebody to lead the way and point out the pitfalls you need to avoid.
Today that pleasure falls to me!
Before I start, don't forget to grab your free multilevel numbering book below.
GET YOUR Free BOOK
Crack the Code to perfect Numbering
- The settings you must absolutely get right.
- Why your numbering is not working? 20+ FAQ's.
- Real-world examples deconstructed step-by-step.
Your details will never be shared. You may opt out any time.

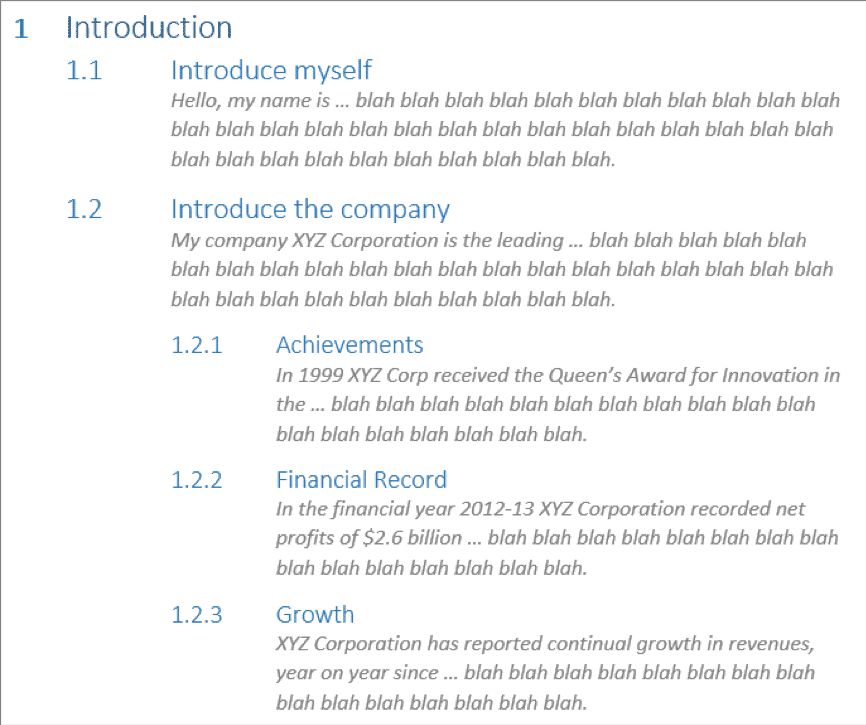
1. What Multi-level Numbering Looks Like
Often used in the legal profession or in large corporate documents, multilevel numbering creates a logical hierarchy and easy navigation within the document. The headings can also be summarised later on in a table of contents. Here is a simple example:
2. How to Set Up Multilevel Numbering
Here is the correct process:
1. Select the text that you want to number (this can be a section of text or the whole document).
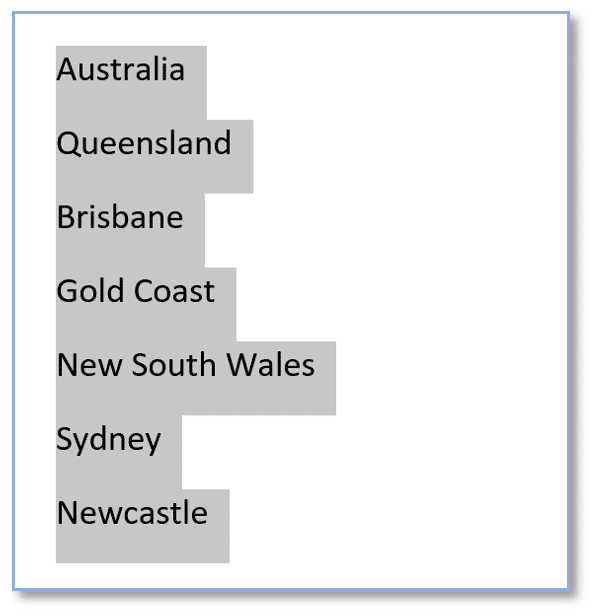
2. Select the Home tab.
3. Click the multilevel numbering icon in the Paragraph group.
4. You can either select an existing layout from the list to use as a starting point, or you can create a new numbering system from scratch. As you hover over each thumbnail image, Word provides a larger image of the numbering system.
5. Choose Define New Multilevel List to display the control dialog.
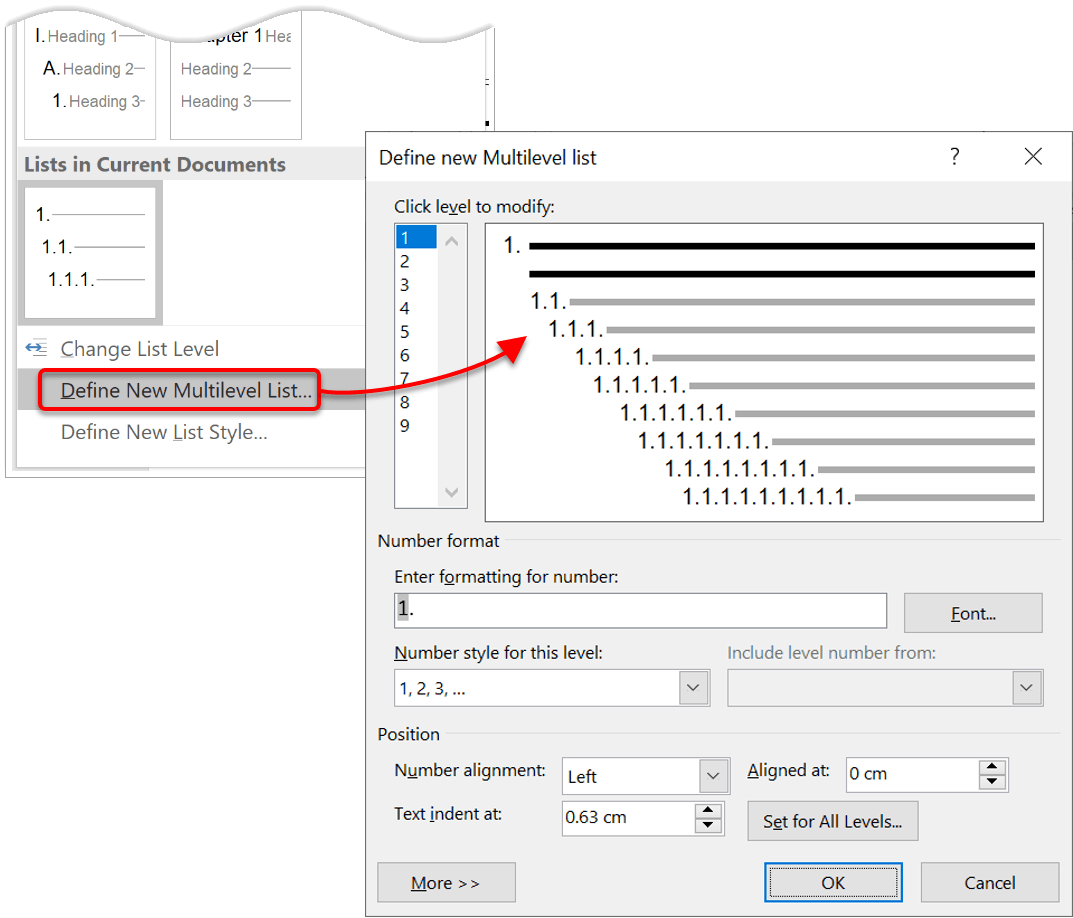
The dialog box can be broken down as follows:
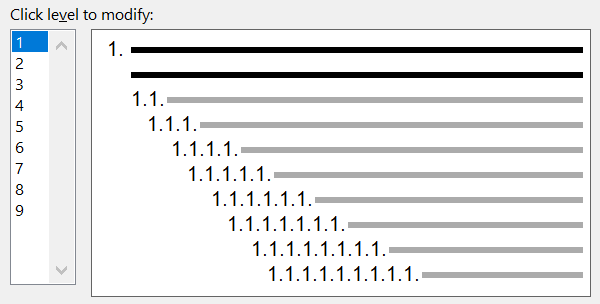
Step #1 Click level to modify
In the top left is a list of levels. As you select each level, the settings in the rest of the dialog box changes.
Level 1 is the highest level, i.e. the main headings such as chapter or section titles.
Level 2 is subordinate to level 1.
Level 3 is subordinate to level 2.
Step #2 Enter formatting for number
This is where the level number is constructed. If you include a previous level number, it will be displayed with a grey background, as will the number for the current level.
Type anything you wish to put in between the numbers such as dots, dashes, brackets etc.
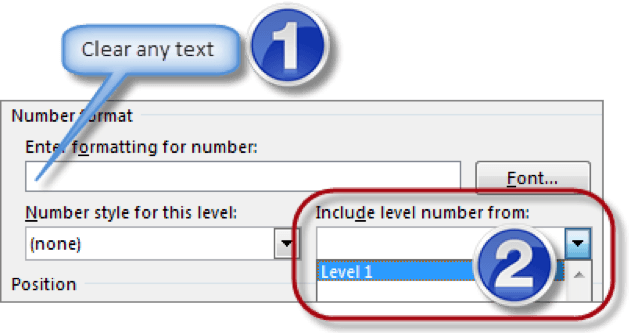
Clear any text in the ‘Enter formatting for this number’ box.
Step #3 Include level number from
When creating a subordinate level (or child level), you can first specify the level number of the parent.
For example, for section 3.2
- ‘3’ is the parent level (level 1) and
- ‘2’ is the child level (level 2)
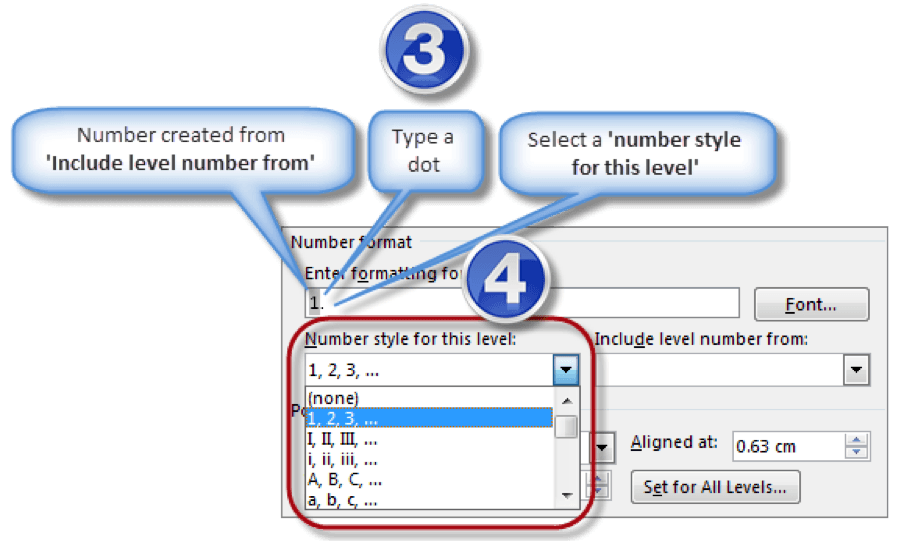
Step #4 Number style for this level
Each level can have its own number style. It may be a standalone style, e.g. 1, 2, 3 or a, b, c or continue on from a higher level, e.g. 1.1.1 or 1.a.i.
- When creating 1.1 numbering, this option is 1, 2, 3.
- When creating 1.a numbering, this option is a, b, c
Step #5 Font
Set the font formatting for the selected level, if you want.

Step #6 Position
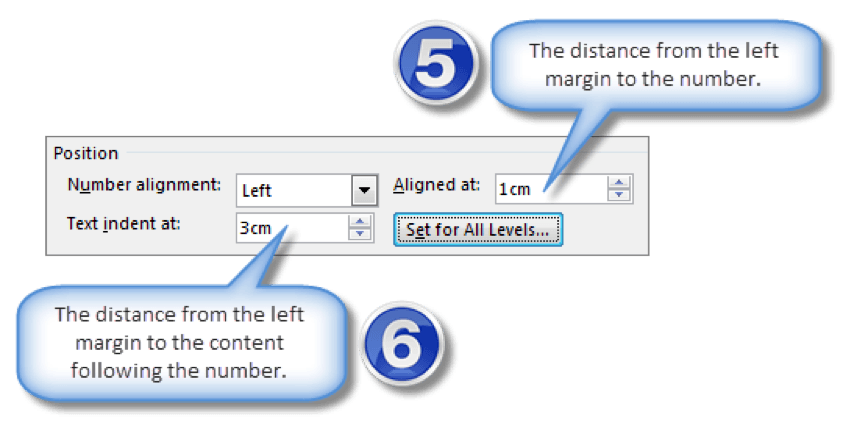
What position from the left margin do you want items for each level of numbering. For example, level 1 items may be 0cm from the left margin, level 2, 1cm from the left margin and level 3, 2cm from the left margin.
Here’s what they mean:
- The Aligned At determines how far from the left margin the number appears.
- The Text indent at figure determines how far from the left margin the text following the number is.
6. Click OK to save all the settings and close the dialog box.
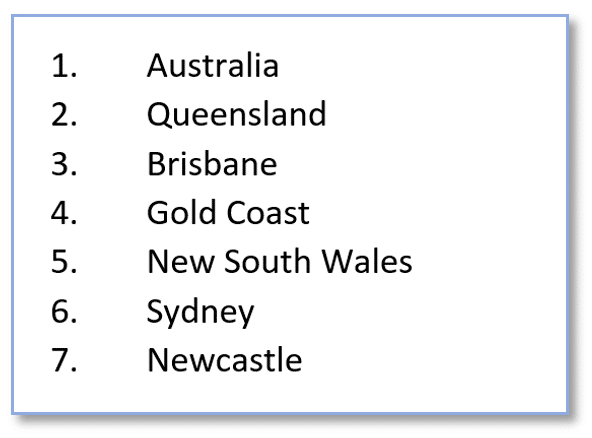
The text you selected in step 1 now looks like this.
17 Multilevel Numbering Templates ready to go
Yours to download and put it to effect immediately. They are very easy to adapt to your precise requirements.
If you can't find or adapt a style that suits your need, we'll create one for you.

The next part is where the magic happens ...
3. How to Apply Multilevel Numbering
Once you have created your numbering system:
1. Position the cursor at the beginning of a line.
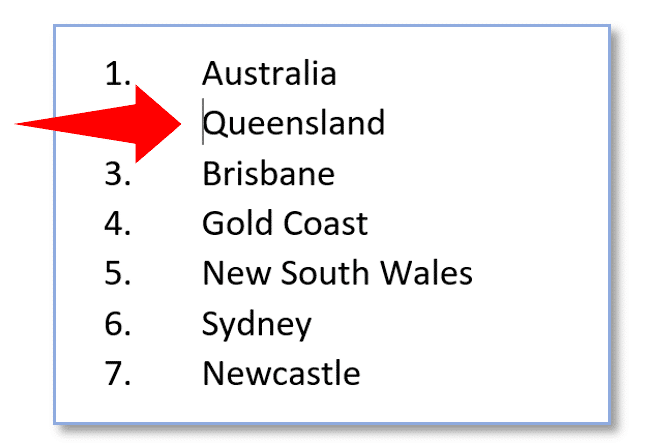
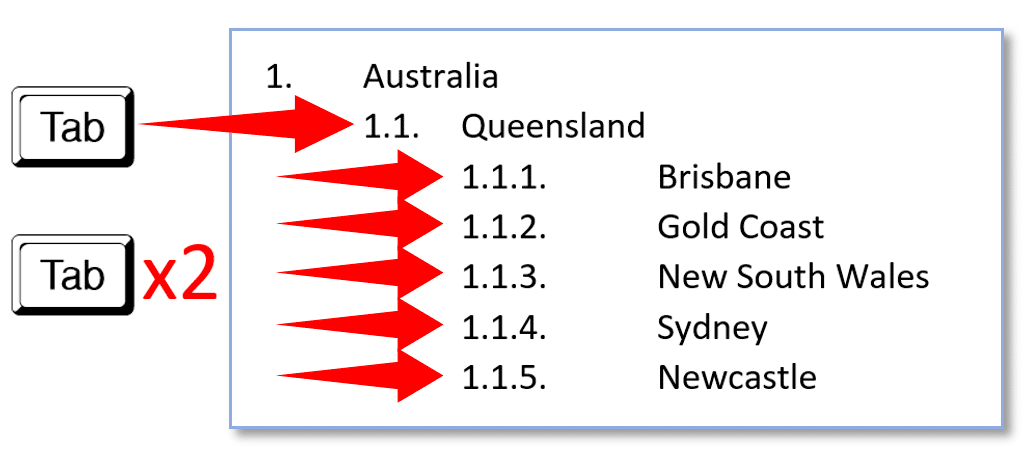
2. Press the TAB key to move the text down a level (demote).
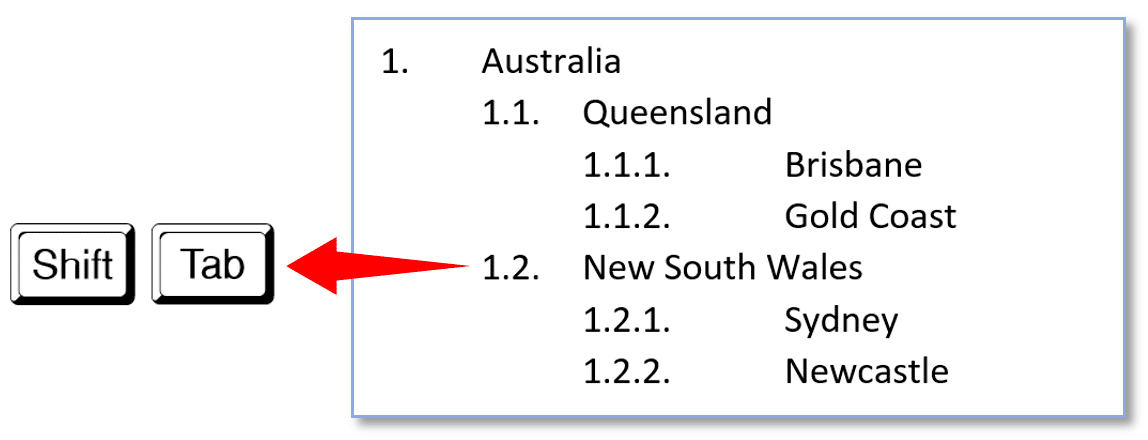
3. Press the SHIFT and TAB keys together to move the text up a level (promote).
If you prefer, you can also click the indent icon to demote and the outdent icon to promote between levels.
4. How to Change Multilevel Settings
Once you have created your numbering system:
1. Reselect all text that is using the multilevel numbering.
2. Click the multilevel numbering icon and select Define New Multilevel List (yes, you choose this option even if you are modifying an existing multilevel list).

The original settings that you defined are redisplayed.
3. In the top-left box select the level that you wish to change, then change your settings.
4. Repeat for the other settings.
5. Click OK to save the settings. Your numbered list should now reflect your new settings.
5. Linking Multilevel Numbering to Styles
Each level of a multilevel numbering system can be linked to a style. This means that as you apply styles throughout the document, the numbering is applied appropriately and automatically. You can either use the built-in Heading 1, Heading 2, Heading 3 styles or use your own custom styles.
1. In the Numbering dialog box, click the MORE button in the bottom-left corner to expand the dialog box.
2. Select level to modify in the top-left box.
3. Open the Link level to style drop-down list and choose the style you wish to connect to the numbering level.
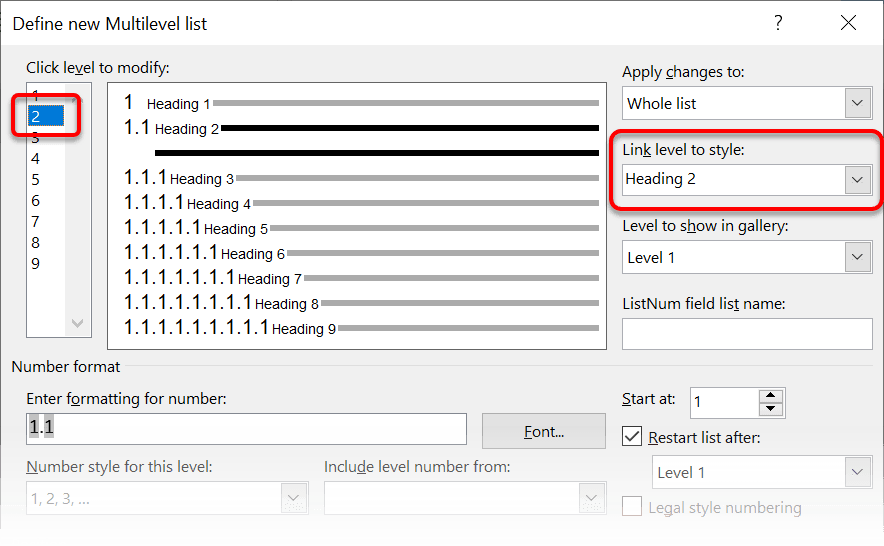
4. Click OK.
5. In the document, apply the Heading 1, Heading 2, Heading 3 styles where needed.
It’s a good idea to create a body text style and apply that where appropriate, so that the body text does not inadvertently get caught up in the multi-level numbering.
6. Select the whole document (or the portion of the document where you want to apply your numbered sections).
7. Click the icon in the Paragraph group (Home tab).
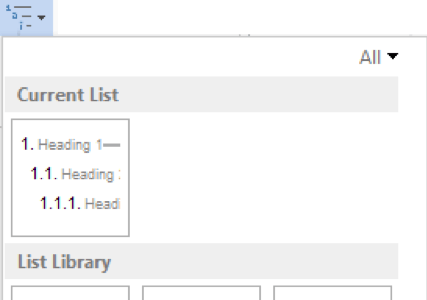
8. Select your custom numbering style from the gallery. The thumbnail image should show the linked styles.
6. How to Use Styles to Set Number Levels
1. Select all the text that you wish to apply the same number level to. Alternatively, if you wish to go line by line, you can place the cursor anywhere in a line of text.

2. In the Styles gallery, click the style that corresponds to the number level you wish to apply. For example, to apply the top level numbering click Heading 1 and for the third level numbering click Heading 3 (assuming those are the styles you assigned).
The numbering and all the numbering settings will be applied to the selected text or the paragraph in which the cursor was positioned.

And that, my friend, is how you do multilevel numbering in Word with no loose ends.
7. What next?
GET YOUR Free BOOK
Crack the Code to perfect Numbering
- The settings you must absolutely get right.
- Why your numbering is not working? 20+ FAQ's.
- Real-world examples deconstructed step-by-step.
Your details will never be shared. You may opt out any time.


17 Multilevel Numbering Templates ready to go
Skip the headaches. Avoid the stress.
Download and quickly adapt one of these ready-made templates to fit your precise requirements. If you can't find or adapt a style that suits your need, we'll create one for you.
Videos and written breakdowns are provided.
Pro-Level Word COurse
Become an expert in record time
If you'd like to accumulate all of my knowledge, shortcuts and pro tips without taking 30 years like I did, take the shortcut and sign up for the.course today.

Document Doctor
Done-For-You Service
Get my eyes on your document.
If you don't have the time or inclination to master Word for yourself, then hire me (Jason Morrell) to get the job done for you quickly and with no loose ends

I hope you found plenty of value in this post. I'd love to hear your biggest takeaway in the comments below together with any questions you may have.
Have a fantastic day.


About the author
Jason Morrell
Jason Morrell is a professional trainer, consultant and course creator who lives on the glorious Gold Coast in Queensland, Australia.
He helps people of all levels unleash and leverage the power contained within Microsoft Office by delivering training, troubleshooting services and taking on client projects. He loves to simplify tricky concepts and provide helpful, proven, actionable advice that can be implemented for quick results.
Purely for amusement he sometimes talks about himself in the third person.
SHARE


I’m trying to create the style [0001], but in the ‘number style for this level’ only goes to 01, 02, 03. I need one that says 0001, 0002, 0003. Is there a way to add that. I tried putting leading zeros in the number format section but then when it goes to 10 it adds another zero. Same for 100. Super frustrating as I have to add the paragraph numbers by hand since I can’t get this working. Thank you!
Hi Ginger. The ‘Number style for this level’ contains options for 1, 2, 3 or 4 leading zeroes. You add the ‘[‘ and ‘]’ as fixed text around the grey-shaded number. I hope that helps.
Jason
Thank you Jason for a very effective guide to the subject. I’m an experienced WORD user, but multi-level lists are a minefield for casual users.
One thing about this site: the link to your free “Multilevel Numbering Troubleshooting Guide” doesn’t work for me. It opens a URL named “http://multilevel/” but that isn’t locatable. Is your Guide available at a different place?
Hi Michael
You can download the guide here: https://officemastery.com/lm/word-multilevel-numbering/
Sorry for the late response. For some reason my site did not notify me. I found a handful of ‘mislaid’ messages today.
This has been really helpful! Thank you. I’m having a little difficulty getting my list started. I’m working on engineering specifications, so a lot of child numbering. I would like to start my list at 1.1, not 1. How can I do this? I’ve tried every way I can think of. Hopefully you haven’t answered this previously. I appreciate your help!
Hi Lori
Thanks for your question. Yes, it’s certainly do-able and it’s a question that’s come up before in various forms.
You still need to keep the conventional structure of 1 (level 1, Heading1 style) and 1.1 (level 2, Heading2 style) so that 1.1 progresses to 2.1, 3.1, 4.1 etc. throughout your document. The trick is to modify the Heading1 style to make the text hidden. Here’s how:
The hidden headings do not consume any space on the finished document. They are just there to provide the structure for the child numbering. When you click the Show/Hide hidden formatting icon to HIDE the formatting, you can see this. Tables of Contents are not affected either.
I hope that helps. Let me know how you go.
Thank you so much Jason! I’ll give it a try. I appreciate your quick response.
it doesn’t work when you have paragraphs between that don’t use all the levels.
for instance heading 1 heading 2 heading 3. (say 1, 1.1, a)) ALL GOOD, then to the 2nd paragraph
heading 1 heading 2 (puts in 2, BUT 1.2 – does not continue with the new number of 2.2 but puts in 1.2!!!
Hi Margaret
It sounds like you’re using a fixed ‘1’ at the beginning of the level 2 definition. Here is how levels 1 and 2 should be set up.
Level 1
Level 2
Let me know how you go.
Hi,
Thats a nice way to explain about multinumbering system. I have been using that for some time in word without any problem. But i need a suggestion regarding inserting numbers in tables.
For inserting regular numbering system i dont have any problem. But when i want to use multinumbering system in the table cells, i am not able initiate the second level (2.1, 2.11…etc) numbering format (as the tab key which is used to initiate the second level works differently in tables). for eg i need the following type of table.
Coumn-I Column-II
1.0 abc
2.0 xyz
2.1 xxx
2.2 yyy
3.0 pqr
On a plain word i could do that, but the same was not able to do in column. Can you please address this issue. Thank you.
Hi Raj
When TAB and SHIFT TAB jumps to the next or previous cell in a table rather than demoting or promoting to the next level, here is what to do.
Multilevel numbering operates differently inside tables or when working with columns. The ONLY way to control your numbering in table cells is with STYLES. All other methods (Tab / Shift Tab, Indent/Outdent, Outline View and Alt-Shift-Left/Right Arrow) do not work within tables.
Create your multilevel numbering definition and link level 1 to the Heading 1 style, level 2 to the Heading 2 style etc. then while in your table cell, select the appropriate style from the gallery to set the number level.
Some useful shortcuts: Press Ctrl+Alt+1 to apply the Heading 1 style, Ctrl+Alt+2 for Heading 2 etc.
You can also use your own custom styles instead of the built-in heading styles.
Let me know how you go.
Thanks jason,
this info saved me a lot of time. worked perfectly and a great way to start my day. Thank you very much
HI Jason,
How do you transfer / copy the multilevel list to a new Document?
Note: Creating a new document from the existing document as a Template is not an adequate solution for our needs.
Hi Simon.
If it’s just you working on one computer (i.e. you are not sharing docs between team members and not using a second computer) then create a new style set on the Design ribbon and then switch to that set whenever you need the particular styles (Heading 1-9 or custom) and the numbering systems you have created.
Another way is to use the Style Organiser (click launcher on styles gallery then Manage Styles icon, then Import & Export). The left list shows the styles for the current doc. The right-hand list shows the styles in the Normal template, which are the default styles used by all new docs. Select a style from one side then click the Copy or Delete buttons as necessary. First copy the styles from the source doc to the Normal Template then again from the Normal template to the destination document.
Or if you’re up to writing a macro, one line of code will do it, as explained in full here:
https://officemastery.com/word-macro-copy-styles-between-docs/
Let me know how you go.
How can I insert the following numbering in a list of tables : Table 4.1 (i) and Table 4.1 (ii)?
To label tables, you use the Captions feature instead of paragraph numbering. Captions (which can be switched to table, figure etc.) only allow a second level of numbering (which works off Heading 1 or similar) but not a third level, as you have requested.
Sorry to be the bearer of bad news.
This is really clear, thank you. I’ve made it work until I reach a level 4 heading. I use the same system as for setting it up (Define new multi-level list) as I did for heading levels 1-3. I don’t need a level 4 heading until section 4 of my document, but it numbers that heading 1.1.1.1 Any hints for what I’m doing wrong? Thank you
Hi Nicola,
I can’t say without seeing it, but recreate level 4 as follows:
Also, click the MORE button to expand the options and make sure that ‘Restart numbering after’ is set to Level 3.
Click OK and you should be good to go.
If this doesn’t fix the problem, then the problem lies with one of the previous level definitions.
Let me know how you go.
Thanks for the info, a great help indeed. Unfortunately this numbering system is not what my bosses want see on the page and table of contents. What they want is this
Introduction
1.1 Aim
a.
b.
c.
1.2 Background
a.
Product Identification
2.1 Description
a.
b
c.
d.
2.2 Operating Principle
a.
Material System
3.1 rgerger
a.
b.
3.2 5y45
a.
b.
c.
etc
and the table of contents to show the same i.e.
Introduction
1.1 Aim……………………………………………………………….5
1.2 Background……………………………………………………5
Product Identification
2.1 Description…………………………………………………….6
etc.
I have tried but cannot see how this can be done. Can you guide me please?
Thanks
Bob
Hi Robert
The trick is to use 2 styles for the top level,
First establish the two top-level styles:
Then set up your multilevel numbering definition:
Then for each top level heading (e.g. Introduction), use both styles as follows:
And what about the Table of Contents?
Construct your table of contents in the usual way but click the Options button and remove the 1 next to Heading 1 and insert a 1 into next to ‘Heading 1 in Words’.
Jason, great guide many thanks! I’ve been wrestling with the styles associated with numbering levels for some time. I create court documents and we number paragraphs regardless of whether they have headings.
In one section I might have a titled and numbered sub-paragraph in which it is great to tag the number level with a heading style. However in a later section I might have a sub-paragraph with no heading and therefore want to utilise a different style to “heading”, can I create multiple levels with different styles?
example:
2.2 Heading (style “heading 2”)
Paragraph text supporting the heading …
3.4 Detail text with no heading … (Style “list paragraph”)
Do you have a steer as to how I might handle this?
Hi Paul. Thanks for your question. I don’t understand the flow of the numbering you are trying to achieve. It’s okay to have numbering on headings or regular paragraphs, but wouldn’t the detail text line in your example be 2.2.1?
Hi Jason,
The issue I face is my document requires different styles for the same number / level. For example, I have associated a “heading 2” style with level 2. However, not all my level 2s are headings, some sections have level 2s as simply numbered paragraphs with no headings. In defining level 2 as “heading 2” I now get the the whole paragraph incorrectly defined as a heading style.
2. Section Header [Style: Heading1]
2.1 Sub-section heading [Style: Heading 2]
2.1.1 Content to support the sub section heading possibly running to multiple paragraphs. [Style: List Paragraph]
2.1.2 Content to support the sub section heading possibly running to multiple paragraphs. [Style: List Paragraph]
2.1.3 Content to support the sub section heading possibly running to multiple paragraphs. [Style: List Paragraph] this works great!
this is works great!
3. Section Header [Style: Heading1]
3.1 Paragraph content with no headings, part of body of multiple paragraphs each individually numbered supporting the section heading. [Style: Heading 2]
3.2 Paragraph content with no headings, part of body of multiple paragraphs each individually numbered supporting the section heading. [Style: Heading 2]
3.3 Paragraph content with no headings, part of body of multiple paragraphs each individually numbered supporting the section heading. [Style: Heading 2]
utilising
I have been on this for some time now trying to work through different solutions. The multi number / level drop down menu that displays: current list, list library, list in current document is only place I have discovered that I can access / edit / “save” any multi number / level styles.
Firstly I removed (right click -> remove from gallery) all of the number styles I do not need (most are ridiculous). I then created two new multi number /level styles with “Define new list style” supporting both the examples above. However, these new styles do not appear anywhere once saved and therefore cannot be used. Whilst creating the new styles you are even prompted to name the list, however they then are not accessible anywhere including the “current list, list library or list in current document” and so cannot be used. I repeated this and again was unable to retrieve any newly created multi number / level style. Is this your experience?
I ended up edited existing multi number lists using the badly titled “define new multi level list”. I found that you cannot repeat the use of any text style within a multi number / level style. So if you want “list paragraph” for level 2 and level 3 you cannot. It accepts the most most recent selection (in this case level 3) but changes level 2 to “no style”.
I found when I switched between the two styles in my document it resets previously formatted sections. I tried to place a section break only to find these have been replaced by page break, inserting these also fails to prevent the format from resetting.
Randomly, but regularly (not as a result of swapping the multi number / level style) the edited multi number / level style would loose all it’s settings. I would have to revisit and insert the correct setting (not just styles but number formats too) using “define new multi level list”.
I am also encountering some other really weird bugs when formatting new sections. I formatted a new section of copied text (pasted as “keep text only”) using one of my edited multi number / level styles, all previous level 2 in all sections are reset to 1.1 (so 2.1 became 1.1 and 3.1 became 1.1 etc.) I had 12 formatted sections at that point.
I tried to follow your trouble shooting number reset and checked the “Enter formatting for number”, all where grey, I selected level 2 from the “include level number” but nothing changed. I tried to reset using the context menu (right click) “set numbering value” and restart numbering, I followed the on screen sequence and select the correct number. I struggled with this too.
Honestly, as a software engineer / analyst in a previous life, I would say this code is still at Beta as it barely works with some major issues. Jason, I do not expect you to have solutions to all Microsoft problems, this is as much to vent but if you can suggest anything I am all ears. During this testing I have reset normal.dotm regularly to ensure I was not using a screwed up template…
Thanks in advance – PC
Hi Paul. Forget ‘Define new list style’. Always work with ‘Define new multi-level list’ even if you are editing an existing setup.
You can create what you need with 5 styles.
Heading 1
Heading 2
Heading 3
Para Level 3 (unnumbered) (based on Heading 3 but without numbers)
Para Level 2 (numbered) (based on Heading 2)
Para Level 2 (unnumbered) (based on Heading 2 but without numbers)
In your example,
for Section 2, the 2, 2.1 and 2.1.1 lines use the standard Heading1/2/3 styles. Any unnumbered paragraphs following 2.1.1 use the new Para Level 3 (unnumbered) style.
for Section 3, the main header uses Heading 1. The numbered paragraphs that follow use the new Para Level 2 (numbered) style. If you required any unnumbered paragraphs in-between, you would use the Para Level 2 (unnumbered) style.
To create Para Level 3 (unnumbered) style:
Place your cursor in any line using the Heading 3 style.
Create a New style. Name it ‘Para Level 3 (unnumbered)’. Make sure ‘Style based on’ says Heading 3
Set the font and font size to match your regular paragraphs.
Click the Format button –> Numbering –> None
Click the Format button –> Paragraph –> Set left indent to the same figure as the ‘Text indent at’ of the Heading 3 style.
To create Para Level 2 (numbered) style:
Place your cursor in any line using the Heading 2 style.
Create a New style. Name it ‘Para Level 2 (numbered)’. Make sure ‘Style based on’ says Heading 2
Set the font and font size to match your regular paragraphs.
To create Para Level 3 (unnumbered) style:
Place your cursor in any line using the Heading 3 style.
Create a New style. Name it ‘Para Level 2 (unnumbered)’. Make sure ‘Style based on’ says Heading 2
Set the font and font size to match your regular paragraphs.
Click the Format button –> Numbering –> None
Click the Format button –> Paragraph –> Set left indent to the same figure as the ‘Text indent at’ of the Heading 2 style.
On completion of this setup, you can place the cursor on any line then click the appropriate style, all of which will be listed in the styles gallery on the Home ribbon. All numbering at each level will flow on correctly, even if you insert breaks of any kind.
You can find a working sample here.
Let me know how you go.
omg…just omg!
I’ve worked my way through this and have been able to replicate, the example is really helpful, many, many thanks.
Also just worked out how to exclude the non numbered heading styles from the TOC, happy days! Now just need to save these to a template for re-use, think I probably need a course, know any good ones? I’m guessing these are the sort of things you cover in your mastery courses?
That’s the kind of reaction I’m after! I’m so glad it solved your problem Paul.
Yes, if you want more like this the Word Mastery course is the place to go. And if you can’t find the answer you’re looking for there, just hit the forums inside the membership. I’m in there every day.
I want in the following style
I Blah
1
2
II Blah
1 A
B
C
2 A
B
i
ii
How to do this?
You have 4 levels of numbering. You need to utilise 5 styles and create 5 levels of numbering, one of which will be hidden.
I have uploaded a sample document if you want to refer to it that has the following number structure:
I. Blah
1 A Blah
B Blah
C Blah
i Blah
i Blah
2 A Blah
B Blah
C Blah
i Blah
i Blah
Before creating your multilevel numbering,
Then set up your numbering like this:
Numbering level 1: (e.g. I, II, III)
Numbering level 2: (e.g. 1, 2, 3 but hidden)
Numbering level 3: (e.g. 1 A)
Numbering level 4: (e.g. B, C, D)
Numbering level 5: (e.g. i, ii, iii)
Once the setup is complete, click on a line or paragraph that you want to number and click the following style in the styles gallery or styles pane:
Let me know how you go.
I have numbered list problem that seems to be a hard one. I have a normal 4 Levels numbered list. Occasionally within the Levels, I have sub-lists with abc, 123 or bulleted. I tried several ways without luck. I have the issue discussed at the MS Office forum.
https://answers.microsoft.com/en-us/msoffice/forum/msoffice_word-mso_win10-mso_2016/single-level-list-nested-in-a-multi-level/6d8cfcd2-b183-4a28-9fe0-9e7e749432e6?messageId=4a6c397e-4a6e-4d06-a6da-3757edd42e4c
Great question Sajit. You need to create additional styles for each ‘single level’ list you want to insert under a standard hierarchical level. I have uploaded a sample document if you want to refer to it.
In the example below, I’ve used Heading 1 to Heading 4 in the conventional way.
Then I’ve used Heading 5 to Heading 8 to use as single level numbering under the first 4 headings.
For example, you can create a 4-level multilevel list that looks like this with single-level lists interspersed at any level. All the numbering restarts and continues as it should:
1. Blah
a) Blah
b) Blah
1.1 Blah
a) Blah
b) Blah
1.1.1 Blah
a) Blah
b) Blah
1.1.1.1 Blah
a) Blah
b) Blah
There are only 9 heading styles, and they are convenient to use because they are built-in, but you can also create as many of your own styles as you need and link any number level to any style.
Here is how to set things up.
Click the Multilevel numbering icon then choose Define New Multilevel List.
Click the More button so you have the expanded dialog open.
Then …
Numbering level 1:
Place the cursor in the ‘Enter formatting for number’ box.
Set ‘Number style for this level’ to ‘1, 2, 3’.
Link level to style = Heading 1
Start At = 1.
Set positioning as appropriate.The ‘Aligned at’ is the distance between the margin and the number.The ‘Text indent at’ is the distance between the margin and the text that follows the number.
Numbering level 2: (e.g. 1.1)
Clear the ‘Enter formatting for number’ box.
Select ‘Level 1’ from the ‘Include level number from’ box.
Type a dot.
Set ‘Number style for this level’ to ‘1, 2, 3’.
Link level to style = Heading 2
Start At = 1.
Restart list after = Level 1
Set positioning as appropriate.
Numbering level 3: (e.g. 1.1.1)
Clear the ‘Enter formatting for number’ box.
Select ‘Level 1’ from the ‘Include level number from’ box.
Type a dot.
Select ‘Level 2’ from the ‘Include level number from’ box.
Type a dot.
Set ‘Number style for this level’ to ‘1, 2, 3’.
Link level to style = Heading 3
Start At = 1.
Restart list after = Level 2
Set positioning as appropriate.
Numbering level 4: (e.g. 1.1.1.1)
Clear the ‘Enter formatting for number’ box.
Select ‘Level 1’ from the ‘Include level number from’ box.
Type a dot.
Select ‘Level 2’ from the ‘Include level number from’ box.
Type a dot.
Select ‘Level 3’ from the ‘Include level number from’ box.
Type a dot.
Set ‘Number style for this level’ to ‘1, 2, 3’.
Link level to style = Heading 4
Start At = 1.
Restart list after = Level 3
Set positioning as appropriate.
Numbering level 5: (e.g. a, b, c under Heading 1)
Clear the ‘Enter formatting for number’ box.
Set ‘Number style for this level’ to ‘a, b, c’.
Type a dot or a bracket after the number if you want.
Link level to style = Heading 5
Start At = a.
Restart list after = Level 1
Set positioning as appropriate.
Numbering level 6: (e.g. a, b, c under Heading 2)
Clear the ‘Enter formatting for number’ box.
Set ‘Number style for this level’ to ‘a, b, c’.
Type a dot or a bracket after the number if you want.
Link level to style = Heading 6
Start At = a.
Restart list after = Level 2
Set positioning as appropriate.
Numbering level 7: (e.g. a, b, c under Heading 3)
Clear the ‘Enter formatting for number’ box.
Set ‘Number style for this level’ to ‘a, b, c’.
Type a dot or a bracket after the number if you want.
Link level to style = Heading 7
Start At = a.
Restart list after = Level 3
Set positioning as appropriate.
Numbering level 8: (e.g. a, b, c under Heading 4)
Clear the ‘Enter formatting for number’ box.
Set ‘Number style for this level’ to ‘a, b, c’.
Type a dot or a bracket after the number if you want.
Link level to style = Heading 8
Start At = a.
Restart list after = Level 4
Set positioning as appropriate.
Once the setup is complete, click on a line or paragraph that you want to number and click the appropriate ‘Heading’ style in the styles gallery.
Notes:
Even though they are called Heading styles, you can use them for anything including normal paragraphs.
By default, Word only displays the heading styles you have already applied plus the next one. For example, if you have only applied the Heading 1 and Heading 2 styles within your document, then the Heading 1, Heading 2 and Heading 3 styles will appear in the gallery. But what if you want to apply the Heading 8 style (a, b, c) without yet having used the Heading 5, Heading 6 or Heading 7 style? Well, do this:
Click the launcher in the bottom-right corner of the styles gallery to display the styles pane.
Click the Options button at the bottom.
In the ‘Select styles to show’ box, choose ‘All styles’.
Choose the style you need.
Did I answer your question?
Thank you Jason you did. That was a great idea I made use of.
Apart from the 8 levels, I also have some additional Styles, Heading 2t and Heading 3t connected to Heading 2 and Heading 3 for text headings that are a long text without boldface. During the course of editing I or anyone else who uses the template may have to adjust the indent in a document such as when the numbering becomes in 2 digits for a level. If I try to set it by adjusting the indent on the connected Formatting Styles. The Linked Styles break up. It is very difficult to get them connected again. In the last instance, it will not work even after connecting them back. I had to delete off the Heading 2t and Heading 3t, recreate and then connect them back. I understand that this is a bug. Can you please help me with a few lines of VBA to circumvent this issue?
It’s hard to make sense of what you are asking for. Shoot me a sample to support [at] officemastery.com.
This helped heaps. Thank you!
I have an issue though
The font i chose for the numbering level is working only for the number itself and not for the text that comes after the number. Any idea how to fix this?
Hi Sush
If you have connected each numbering level to a style (the best approach) then by clicking the style in the gallery, the style of the numbering and the following text should be consistent.
If the numbering levels are NOT connected to styles, then you will need to click the drop-down arrow on the multilevel numbering icon and choose ‘Define New List style’. Whatever you define here determines how the number will look and not the text that follow it. In the ‘Apply formatting to’ box, choose a numbering level. For more than one, do each style separately.
Let me know how you go.
Thanks for your tutorial 🙂
You’re welcome.
¯\_(ツ)_/¯
Hi. I have something different (I think). My attorney wants Article I (roman numerals) as a header, then change to legal numbering in Arabic (1.1) for paragraphs underneath. Here’s the question: how do I get Article II’s legal numbering to being with 2, i.e. (2.1)?
Hi Jenny
Numbering level 1:
Numbering level 2:
Make sure ‘Legal style numbering’ is on for all levels from level 2 onwards. This switches the I, II, III style to the 1, 2, 3 style.
Thanks, Jason. I’ll try it. I also appreciate the prompt response.
What if I do not want to use Normal Heading styles (since they will be used differently)? I want to create styles for the list levels. Is that no longer possible?
Also, I’m trying to set up 20+ templates with the same multilevel numbering styles. I’m trying to copy the styles I created to the various templates but it just doesn’t seem to work.
Hi Jason,
For years I have been trying to figure out how to convert our Master Specs from WordPerfect to Word. In WordPerfect, the outline format is really easy to use. I literally open up a spec document, update the headers and footers for the specific project, make the necessary changes to the font and the outline format at the beginning of the document and it is done. To create other sections for the same project, I isolate the headers/footers and the format section (which are easily seen in WordPerfect’s “Reveal Codes”). I then copy the body of another spec section and paste it into that document to create the other project specs.
Formatting in Word has nearly driven me CRAZY!! After viewing your video and reading your answers to all the questions which have been submitted, I am hopeful (fingers crossed) that I might now be able to figure out how to convert our specs to Word format. I want to retire next year and I have to figure this out!! Thank you!
Peggy, welcome to the site. I remember using WordPerfect 30 years ago and to be honest, I didn’t realise it was still a thing! There you go.
I’m glad you found the video useful. To reveal the formatting in Word, click on the required text then press Shift F1. All info is displayed in the sidebar. Formatting is best controlled through the styles found on the Home ribbon. It saves a lot of time if you can get your head around these.
All the best.
Thank you, I have applied a multilevel list to a document and have restricted said document so that users can only add to/create a Level 2 list. However, if a user inadvertently presses ‘Enter’ twice in the document, my Level 2 list goes back to my Level 1 list (which is meant to be off-limit after restriction). I cannot figure out what I have done wrong, can you help?
Hi Jacqui
Assuming you have linked numbering level 1 to the Heading 1 style, level 2 numbering to the Heading2 style etc, modify the Heading 2 style on the Home ribbon and make sure that ‘Style for the following paragraph‘ is set to Normal. This will prevent your unauthorised user from reverting back to Level 1 when pressing Enter twice.
Then (and I assume this is what you have already done), under the Review tab | Protect | Restrict Editing, tick the box labelled ‘Limit formatting to a selection of styles‘, click the Settings link and untick Heading 1. Finally click the ‘Yes, Start Enforcing Protection‘ button and type your password.
In the style gallery on the Home ribbon, the Heading 1 style should no longer be displayed.
I hope that helps. If I have misunderstood, let me know.
Jason
Sir I need to have this for a thesis – how do I define it in MSWord
CHAPTER ONE: INTRODUCTION
1.1 Background to the study
1.1.1 Another heading
There is no simple way to do this without some manual intervention. Multilevel numbering is a hierarchy, like a series of cascading waterfalls. At the top level you can choose the ONE, TWO, THREE style (from the dropdown list) instead of 1, 2, 3 but level 2 would then show ONE.1, ONE.2 etc. and level 3 would show ONE.1.1, ONE.1.2 etc.
I don’t think your links are working for the guide -it keeps returning me to the same page so I can’t see the 28 FAQs.
So, on the page you click the image and enter your details in the pop up box. The link for the troubleshooting guide is then emailed to you. The link is working, but there is no record of your email in our CRM.
Hi. Is it possible to add a multilevel numbering style to the numbering gallery? I have a nmulti level numbering style all connected to syles with specific margins, fonts etc. I have to use this formatting quite often both on new documents and existing documents. Is there a way to do it besides exporting the styles for each (existing) document?
There are 2 ways to do this.
1. Export your styles to the Normal template (Normal.dotx). Styles in the normal template are available to all documents.
2. (The better way). Create your own style gallery. To do this, go to the Design tab and click the drop-arrow on the right side of the Style Set gallery, then click Save as a New Style Set. Styles in any style set can be added, removed or modified. You can switch back to the default style set at any time. Word will always use the ‘last used’ style set so you don’t have to keep switching over to it every time.
Thanks for the great tips. I have a strange issue. I have a requirements document that will have many levels deep. In some cases, an item is a header. In others, it is a detail.
1 Topic header
detail
1.1 detail item
1.2 detail item
2 Topic header
detail
2.1 Topic header
detail
2.1.1 detail item
2.2 Topic Header
2.2.1 detail item
It appears that this can’t be done (having multi level apply to lines that may be a header OR a detail.
Or am I missing something?
Fletcher, this is actually quite easy to fix.
For each level, you need to have 2 styles to hand, one for numbered items and one for detail items.
For the numbered items, you can use the built-in styles such as Heading 1, Heading 2 etc. (or another style of your choice) and when you set up your numbering, link each level to a style (e.g. level 1 to Heading 1).
For the detail items, either create a new style or clone the existing Heading 1/2/3 etc. Set the indentation and any other font/para attributes etc. Name the new styles something like Heading 1 detail, Heading 2 detail etc.
Once that is done, everything is controlled by the application of styles. The numbering will flow correctly while allowing detail paragraphs to be interspersed throughout.
Let me know how you go.
Jason – the problem is when I have headers and details. I can’t get the detail to honor the header numbers – they are different styles. The headers work (so 2.1 is correct), but the detail numbers don’t recognize the level 1 number, so they all start with 1. The number to the right of the text is what I expect. If I try to edit the multilevel to hard code the first lead number, then all the number details change.
1. Lvl1 Header 1
Text Description
1.1. Number detail 1.1
2. Lvl1 Header 2
Text Description
2.1 Sub Header 2.1
Text Description
1.2.1 Number detail 2.1.1 sub detail <<== This is where it gets confused
3. Lvl1 Header 3
Text Description
1.1. Number detail 3.1 <== Same here
1.2. Number detail 3.2 <== Same here
My guess is that the multi level items don't see a level 1 item (because there isn't one, only the header has one). So they always start with 1.
NOTE: If I only used headers and numbers, with no cases where a header and a number shared the same level, this would be a non-issue. So if I didn't need the 2.1 Sub Header or had no level 2 numbered items, life would be great.
It sounds like your level 3 definition is not set up correctly. You should NEVER hard-code a number. Try this:
1. Click on any numbered item, click the multilevel numbering icon and choose Define New Multilevel List.
2. In the dialog box, select level 3.
3. Delete the current entry in the ‘Enter Formatting for Number’ box.
4. Select Level 1 from the ‘Insert level number from’ box.
5. Type ‘.’.
6. Select Level 2 from the ‘Insert level number from’ box.
7. Type ‘.’.
8. Select 1, 2, 3 from the ‘Number style for this level’ box.
9. Click the MORE button and select Heading 3 from the ‘Link level to style’ box.
Let me know how you go.
Step #9 is the problem. If I set Heading 3 to link to, the #s are correct (good), but now it want’s to be considered a header and show in the TOC (bad.) I can’t tell the TOC to filter out 3 level header items because some of them may belong in the TOC. I can send you a simple Doc that shows the problem, it that would help.
And I REALLY Appreciate your help, this can be quite mind numbing….
Create a new style and link your level 3 to that instead. You can link to any style, not just Heading 3.
Alternatively, when you create your TOC, tell it to only use 2 levels instead of 3.
Jason – I think I have found the issue.
I can create a new multilevel and style, but can’t convey values between them.
The problem is the number item style doesn’t communicate with the Header number sequence, so the level 1 value doesn’t increase when the header level 1 does.
For example, I need to create the following where the number in parenthesis on the right represent the item numbers.
Header 1 Topic (1)
Text description
Number Item 1 (1.1)
Header 1 Topic (2)
Text description
Header 2 Sub-Topic (2.1)
Text description
Header 3 Sub-Sub-Topic (2.1.1)
Text description
Number Item 1 (2.1.1.1)
Number Item 2 (2.1.1.2)
Header 2 Sub-Topic (2.2)
Number Item 1 (2.2.1)
When I try to add the 1st Number Item, it works great (1.1). But when I try the next one, instead of 2.1.1.1, I get 1.1.1.1. and 1.1.1.2. The reason is that it is tied to the first Number Item, not the heading values. And nothing has been done to increment the first numbered item level from 1 to 2 (even though the header has incremented to 2.1.1.)
I can accomplish the above, but only with multi level lists that have the first (and sometimes second) levels hard coded and specific to a given header.
That being the case, your level 1 numbering is not linked to your Heading 1 style, just like your level 3 heading was not linked to your Heading 3 style before. To reiterate you should never hard-code a number anywhere in your multilevel number set up.
Do this:
1. Click on any numbered item, click the multilevel numbering icon, choose Define New Multilevel List, then click the MORE button to expand the dialog box.
2. Select level 1. Check that ‘Link to style’ says Heading 1 (you’ll probably find it isn’t).
3. Select level 2. Check that ‘Link to style’ says Heading 2.
4. Select level 3. Check that ‘Link to style’ says Heading 3.
Though I have already created “styles” of headings, by I don’t find the same in the Multilevel list, and also I am finding it difficult to apply numbering in my multilevel document. Hope to revisit my previous efforts on the basis of your above erudition.
Cool. Thanks Syed.
And that, my friend, is how you do multilevel numbering in Word with no loose ends. made me really like you.
Awww thanks Mark. It’s nice to be liked!
thank you very much for this fast learning! I spent a few minutes to learn it, and now I learned how to apply it in all documents.
Fantastic. Keep going!
Hi, Jason. I’m work with documents that have lettered appendices. I set up Heading 7 as the main appendix heading so that it generates in the table of contents, but I’d like to also set up auto-numbering for other headings within the appendices. I’m having difficulty combining letters and numbers in the multi-level list. Currently the main (level 7) heading is APPENDIX A, B, C, etc., but I can’t get the following levels to show as A.1, A.1.1, B.1, etc. Do you have any suggestions?
In the multilevel numbering dialog:
1. Select level 7.
2. Select A, B, C from the ‘Number style for this level’ dropdown list.
3. Click the MORE button and link the number level to style ‘Heading 7’.
4. Select level 8.
5. Select ‘Level 7’ from the ‘Include number from level’ box.
6. Type a dot.
7. Select 1, 2, 3 from the ‘Number style for this level’ dropdown list.
8. Link the number level to style ‘Heading 8’.
9. Select level 9.
10. Select ‘Level 7’ from the ‘Include number from level’ box.
11. Type a dot.
12. Select ‘Level 8’ from the ‘Include number from level’ box.
13. Type another dot.
14. Select 1, 2, 3 from the ‘Number style for this level’ dropdown list.
15. Link the number level to style ‘Heading 9’.
That’s it. Download the free troubleshooting guide at the top of this post for more inspiration and answers to other frequently asked questions.
Let me know how you go Kathy.
i just want to ask if you can combine 2 different style of multilevel numbering.
for example heading 1 use roman style and heading 2 & 3 use legal style.
like this one :
i. This is heading 1
1.1 heading 2
1.1.1 heading 3
best regards
Absolutely. For numbering level 1, choose i, ii, iii from the ‘Numbering style for this level’ dropdown list. For levels 2 and 3, choose the 1, 2, 3 style. All the best.
Dear Jason,
Thank you very much for your guide, it was very helpful to me.
However, I am interested in making lists that have more than 9 levels. I understand your comment that generally, more than just a few are not necessary – which probably is why only 9 are available to begin with – and that more than e.g. six is often confusing. Some weird projects however, are just the more confusing without proper numbering, and in my case I would need about 20 levels for a genealogy project, where this systems is the clearest I can come up with. It works if you put in the numbering by hand, but it would be a dream for me if I could get Word to automate it for me.
I have seen guides relying on SEQ to get more than 9 levels, but I do not understand them, as I have no experience with this method. If you know more how to get more than 9 levels to work following the same logic, I would be grateful to hear more about it.
kind regards
Hi Jan
While you could theoretically use the SEQ field to create 20+ levels of numbering, it is a time-consuming process and offers no real advantage over typing your numbers manually. For what it’s worth, here’s how it works:
Field are enclosed in braces { } but you cannot just type them – you must insert a field. To insert any field into a Word document, press Ctrl F9 then type in the field name followed by any relevant switches OR on the Insert ribbon click ‘Explore Quick Parts’ then ‘Field’.
Sample file at https://officemastery.com/example/multilevel-numbering-using-SEQ-fields.docx
The following fields …
{ SEQ Lev1}
{ SEQ Lev1 \c} {SEQ Lev2 \r 1}
{ SEQ Lev1 \c}.{SEQ Lev2 \c}.{SEQ Lev3 \r 1}
{ SEQ Lev1}
{ SEQ Lev1 \c} {SEQ Lev2 \r 1}
{ SEQ Lev1 \c}.{SEQ Lev2 \c}.{SEQ Lev3 \r 1}
{ SEQ Lev1 \c} {SEQ Lev2}
{ SEQ Lev1 \c}.{SEQ Lev2 \c}.{SEQ Lev3 \r 1}
{ SEQ Lev1 \c}.{SEQ Lev2 \c}.{SEQ Lev3 }
{ SEQ Lev1 \c}.{SEQ Lev2 \c}.{SEQ Lev3 }
… result in the following numbering
1
1.1
1.1.1
2
2.1
2.1.1
2.2
2.2.1
2.2.2
2.2.3
Press Ctrl-A then F9 to update the document numbering.
Press Alt-F9 to toggle between displaying the fields and the results.
You can speed things up by creating AutoText Quick Parts.
Then in your document:
This inserts the block of text called Lev2 into your document, and save the hassle of repeatedly creating fields or spending hours copying and pasting. Keep an eye on the \r 1 switch – use it or remove it as necessary.
As I said at the start, it can be done, but it’s a lot of work and you’ll need to check it carefully before you publish.
Good luck!
Jason
Dear Jason,
Thank you for you thorough reply and the effort you put into it.
It seems that I do not entirely understand the utility of SEQ numbering. It it still “automated” or not? Meaning that after it has been manually added, does it automatically change if you add numbers inbetween? Adding sequences would not be a problem, but the usefulness I imaged would be as follows: e.g., you think you have mapped a family, but later you find out that you missed one person. Somewhere in a sequence, you need to add a person. Consequently, the next sibling in that family change a number, plus all the children of those siblings. Can the SEQ entry account for this automation?
Once it is set up, you can manually update the entire document (any time) by pressing Ctrl-A then F9 and all the numbering will update. So if you need to insert another family member, do so then update the document. In that sense, SEQ fields provide automatic updating of the numbering. However, you still have all the work of inserting the fields in the first place.
I realise that this may be a very simple question, but I cannot get the SEQ to work. I can find the field “SEQ” and add it, but I cannot add the information between the brackets to get it to work. I have tried to follow other guides on this as well, but I suppose it still eludes me.
If you are inserting the SEQ field using the Insert ribbon | Explore Quick Parts | Field, then click the Options tab to display the switches and choose one.
If you are inserting the SEQ field by pressing Ctrl-F9 then you can type anything you like between the braces.
To edit an SEQ field that is currently showing the number, right-click the number (which should have grey shading behind it) and choose Toggle Field Code.
Hi Jason,
Thanks for helpful points. I am trying to set default font (complex script) in multilevel numbering list in Word 2013 but “set default” icon is not active there. Each time starting Word, I need to define a complex multilevel numbering, I should set it manually for that session and then it goes off when exiting the application.
For the normal writing style I have done successfully the default fonts for both Latin and complex scripts but in multilevel numbering list it doesn’t work.
How I can set default my choices in this menu?
Hi Taghi
First, if you link each multilevel numbering level to a style (e.g. link Level 1 to Heading1, Level 2 to Heading 2 etc.) you will not have this problem.
Second, I strongly suggest that you never use the Normal style as-is within a document. Think of the Normal style as your baseline style, then create your own styles based on the Normal style, but leave the Normal style alone.
Third, if you want to copy your styles between documents, open the Styles pane, click the Manage Styles icon at the bottom, then click the Import & Export button, then use the 2 boxes to copy styles between your current document and the Normal template (or vice versa).
Alternatively, create this one-line macro and run it:
Sub Copy_styles_from_master_doc()
ActiveDocument.CopyStylesFromTemplate Template:=”C:\folder\folder\your_master_file_name.dotx”
End Sub
Let me know how you go.
Jason
No reference to how you can use the heading numbers to refer to a piece of text:
” In section??, we learn how to put in cross-references…”
Annabelle, that’s a different topic, but here is the quick version.
First you bookmark an item, then cross-reference the bookmarked item:
1) Select the item you want to reference, or position the cursor in front of it.
2) On the Insert ribbon, choose Bookmark. Type a name for the bookmark. Don’t use spaces.
3) Position the cursor at the point where you want to refer to the bookmarked item (e.g. in Section??).
4) In the Insert ribbon again, choose Cross reference.
5) Set ‘Reference type’ to Bookmark. Set ‘Insert reference to’ to Bookmark text or Page number.
I have an upcoming post that covers the process in more detail but that should be enough to get you started.
Jason
Great Tutorial on Numbering. Big Help to me on my current project. Thank You Very Much
Thank you Soma
Very nice video, thank you.
I have 3 questions, I wonder if you answer them
1) what if you want the body text under each numbered list to be indented according to the level of each numbered list? – like in a procedure document.
2) what if you want to create new style names (not reuse existing “heading x” style names)
3) what if you want to remove multilevel list levels? (when I go to define new multilevel list), it starts with 9 levels 1.1.1.1.1.1.1.1.1., so I want to remove the last 4.
thanks ahead of time!
RL
Hi RL. Some good questions there.
1) When you define your multilevel list, for each numbering level, set the ‘Aligned At’ and ‘Indent At’ at the bottom of the dialog.
2) You can use any styles you like, so if you have created some custom styles, link to those instead of Heading 1/2/3 in the multilevel numbering dialog.
3) You can define up to 9 levels but you don’t have to use them all. The most I’ve ever used (for a legal client) was 6 levels.
I hope that helps. All the best RL.
Jason
Hi I found your video very helpful. I have a large document containing numbering which in part has been entered using word and in part entered manually. Is there a simple way to get rid of the existing numbering and start again using word?
Hi Bill. If the numbers have been typed in, you have no choice but to delete those, but if the numbering (in whatever form and however messy) is a numbered list then there is hope!
1. Place the cursor on any top-level item.
2. Click the multilevel numbering icon and choose Define New Multilevel List.
3. Set up each numbering level the way you want it and make sure to click the MORE button and link each level to a style (i.e. level 1 to Heading 1, level 2 to Heading 2 etc.)
4. Place your cursor on each numbered item in the document and select the appropriate style in the styles gallery.
It sounds like a lot of work, but you should be able to get about 100 pages done per hour, depending on how much content is numbered. There is no shortcut. Just gotta get your head down and chip away. Once it’s done, and your numbering is straightened out, your document will update itself like a dream.
Good luck.
Thanks Jason.
No worries Bill.
After some frustrating hours of trying to get a 3-level numbering to work and following a bunch of instructions that didn’t help, I found this one. Half an hour later, my document looks as it should. Thank you so much, Jason, for this help, it is greatly appreciated!
Only thing to mention, I had to link the numbering to styles because the tab key does not demote text in Word 2016 for Mac.
Hi Pascal. I’m glad you found a way to get it to work. You can also use the indent/outdent icons on the Home ribbon to promote/demote a level, regardless of whether or not numbering levels are connected to styles. All the best. Jason
This is a great tutorial I have used twice. But I run into problems you don’t. Such as once I have created a multilevel list and go to add my heading to the link portion it selects, I click ok, then it resets it when I reopen it. Or the Heading itself unlinks and won’t apply. Or the heading applies, but the numbers under that heading, say V.1 stays I.7. It seems this could be a good system, and I have used it before, but with these problems it is almost unmanageable.
Hi Chris. Styles shouldn’t unlink from a defined number system when you reopen a document. Shoot me a sample at su*****@******om.au and I’ll take a look. (Remove any confidential or private info first). Jason
This was very helpful. I now understand how to use Multilevel numbering which has been a huge challenge to me Thanks a lot.
You’re welcome Tochi.
Thanks Jason, clear explanation unlike other sites! Now I set up in my documents as template.
Thanks Fabien. I’m glad it helped.
Best explanation ever. Very clear. Thanks so much.
I’m glad it was helpful. Thanks Luciana.
Can the text that goes under a level be linked to the outline level or does it another style with a similar name so that it is placed next to the outline level in the balcony?
Hi Sajit. There’s a few points tied up in your question.
1. If you press SHIFT ENTER to create a soft return instead of just ENTER which creates a hard return, then the following text will be part of the same paragraph or numbered item (if that’s what you were getting at).
2. If you use the standard Heading 1/2/3 styles, they are always listed together by default. If you create your own custom styles, then use a common prefix (like your initials) and in the styles pane they will be listed together alphabetically.
3. By ‘balcony’, I assume you mean the Styles Gallery on the Home ribbon?
Does that help?