In this post you'll discover how to create a link from the current workbook to other content such as files, web pages, another location within the same workbook or create a new email that is pre-addressed and pre-subjected.
You'll also see how to create a link that can be activated from a text item or from a graphic (shape, picture etc.)
1. What are links (formerly called hyperlinks)?
A link is a special piece of text or a graphic (shape, picture, icon, 3D model etc.), that when clicked, takes the user to a specific place.
That ‘place’ might be another file, another place in the same file, a web page or a new e-mail message.
Links are most commonly found in websites.
Linked text is normally blue and underlined and changes to purple and underlined once the link has been visited.
2. Create a link to a specific cell in another workbook
1. Click the Link icon on the Links group of the Insert ribbon or press Ctrl K.
The Insert Hyperlink dialog box is displayed.
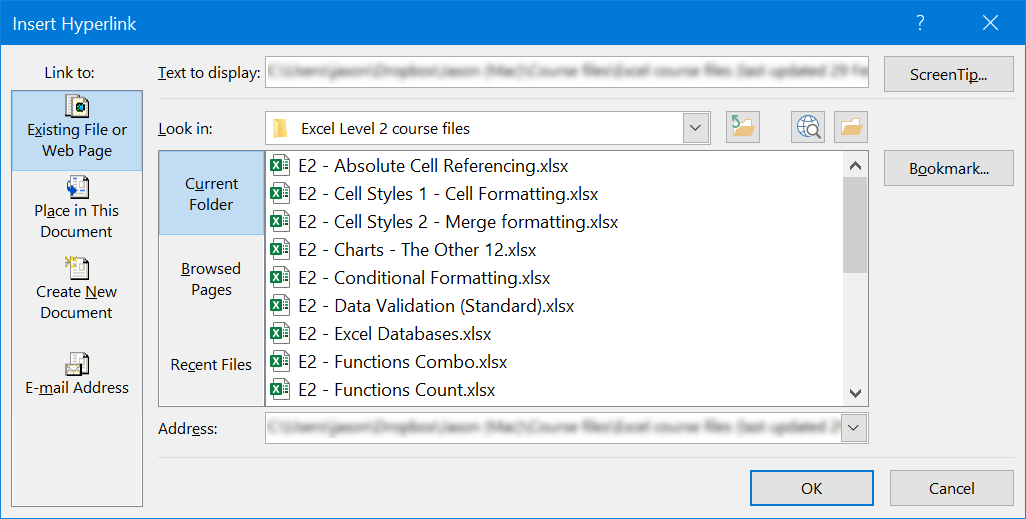
2. In the Link To panel, on the left, select Existing file or web page.
3. In the main area of the dialog box, navigate to file to be linked to. The path and filename will be displayed in the Address box.
4. In the Text to Display box, type the text that will be displayed in the cell(s) on the worksheet. If text was selected prior to opening this dialog box, it will already be displayed here.
6. Click the Bookmark.. button. A list of worksheets available in the chosen workbook are displayed.
7. Select a worksheet from the list.
8. Select a cell within the worksheet.
9. Click OK.
3. Create a screen tip
A screen tip can be provided, if required. A screen tip is the small label that appears when you hover the mouse pointer over a cell or graphic that contains a link.

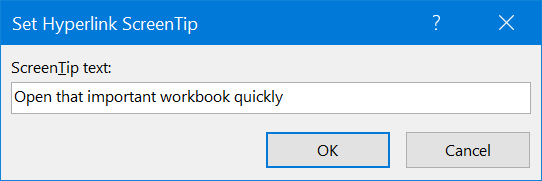
1. In the Insert Link dialog box, click the ScreenTip... button.
2. Enter the screen tip text.
3. Click OK twice.
4. Create a link to another place in the same workbook
1. Click the Link icon on the Links group of the Insert ribbon or press Ctrl K to open the Insert Hyperlink dialog.
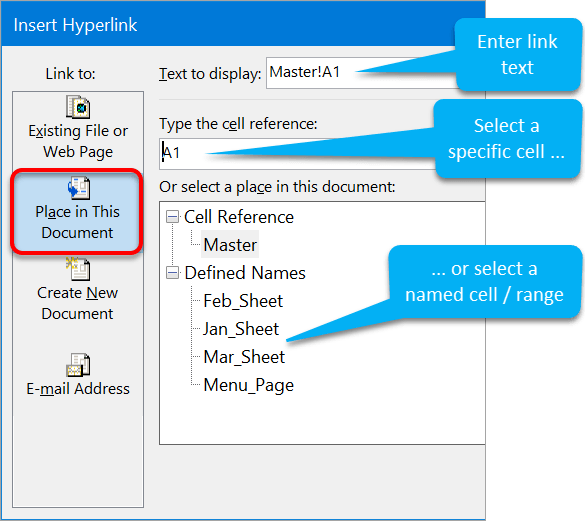
2. In the Link To panel, on the left, click Place in this document.
3. The list of worksheets within the current workbook are displayed.
4. Select a worksheet from the list.
5. Select a cell or named cell / range within the worksheet.
6. Set the Screen tip and Text to Display appropriately.
7. Click OK.
5. Create a link to a web page
1. Click the Link icon on the Links group of the Insert ribbon or press Ctrl K to open the Insert Hyperlink dialog box.
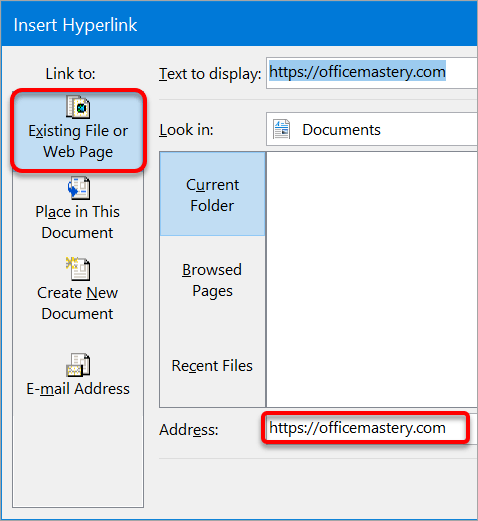
2. In the Link To panel, on the left, click Existing file or web page.
3. Type a web address in the Address box. NB. Just type the www address and the http:// or https:// component will be added automatically.
4. Set the Screen tip and Text to Display appropriately.
5. Click Ok
6. Create a link to open up a new pre-configured email message
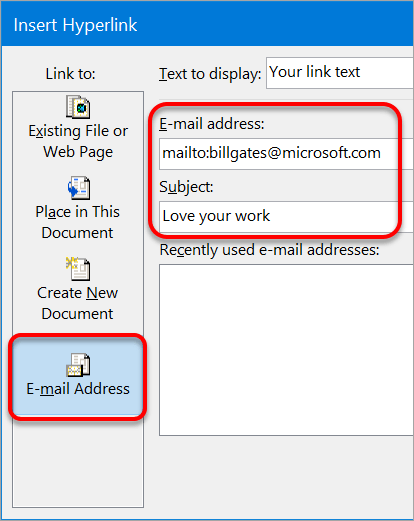
1. Click the Link icon on the Links group of the Insert ribbon or press Ctrl K to open the Insert Hyperlink dialog box.
2. In the Link To panel, on the left, click E-mail address.
3. Type in the addressee’s E-mail address.
The mailto: prefix is added automatically.
4. Type in the Subject of the e-mail.
5. Set the Text to display, if required.
6. Click OK.
7. Edit an existing link
It is a little tricky to select a cell or graphic which has a link. It cannot be left-clicked because that would activate the Link. Instead:
1. Right-click the text or graphic that contains the link.
2. Choose Edit Hyperlink from the context menu.
8. Remove a link
1. Right-click the cell and choose Remove Hyperlink from the context menu.
9. Link to something from a graphic
10. Key Takeaways
I hope you found plenty of value in this post. I'd love to hear your biggest takeaway in the comments below together with any questions you may have.
Have a fantastic day.


About the author
Jason Morrell
Jason Morrell is a professional trainer, consultant and course creator who lives on the glorious Gold Coast in Queensland, Australia.
He helps people of all levels unleash and leverage the power contained within Microsoft Office by delivering training, troubleshooting services and taking on client projects. He loves to simplify tricky concepts and provide helpful, proven, actionable advice that can be implemented for quick results.
Purely for amusement he sometimes talks about himself in the third person.
SHARE


