As an author or content creator, you've put a lot of time, thought and effort into producing your finished product. You should now spend a few minutes to protect your Word document.
It's amazing how quickly somebody can steal it, plagiarise it and claim your document as their own. It's your IP (Intellectual Property). Claim ownership, before somebody else does.
Thinking on a larger scale, in a team environment where documents may have many contributors it is wise to implement certain controls to ensure that documents are not lost, corrupted, destroyed or altered, either deliberately or unwittingly.
1. How to protect your Word document (where to go)
The Backstage holds the key. This is where you can find a number of tools and different measures to protect your Word document.
1. Select the File tab.
2. Click Info on the left side panel, if necessary.
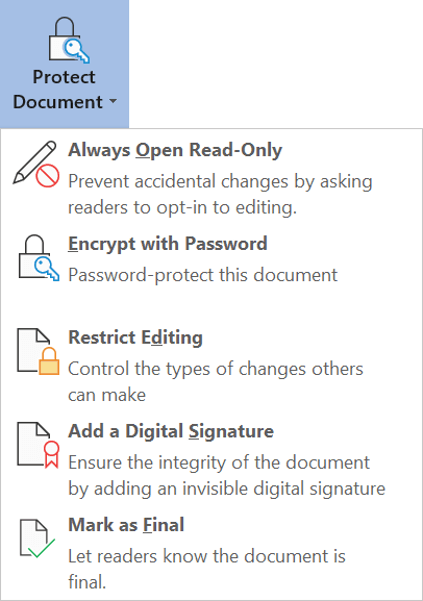
3. Click the Protect Document button and select one or more of the options presented:
2. Protect a document by marking it as FINAL
When a document is complete and you want to lock it down to prevent any further changes, the Mark as Final option will protect the document by making it read only
Mark as Final is the minimum form of document protection and can be easily bypassed.
1. Select the File tab and click Info on the left side panel, if necessary.
2. Click the Protect Document button.
3. Select Mark as Final.
A confirmation page is displayed.
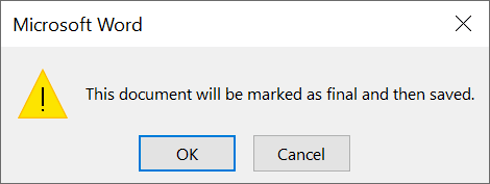
If you are sure you want to proceed, click OK and a confirmation statement is displayed.

This is the weakest form of protection available. The next time the document is opened, a message in the status bar at the top of the screen states that the document is marked as final to ‘discourage’ further editing, but an ‘Edit Anyway’ button is provided which lets you bypass the restriction.

3. Protect a document by making it Read-Only
A simple way to protect a document is to only allow it to be opened but not modified.
1. Select the File tab and click Info on the left side panel, if necessary.
2. Click the Protect Document button.
3. Select Always Open Read-Only.
The button changes colour to show that the option is switched on. A message confirms this.

4. Protect a document with a password
A stronger form of protection is to add a password and then only give the password to particular people.
1. Select the File tab and click Info on the left side panel, if necessary.
2. Click the Protect Document button.
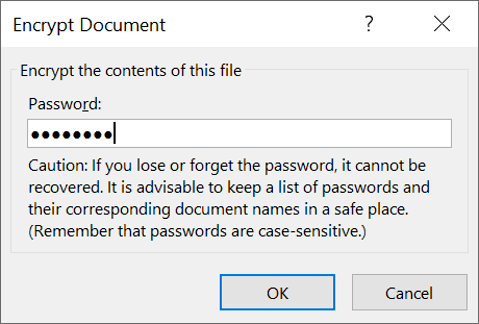
3. Select Encrypt with Password. The Encrypt Document dialog box is displayed.
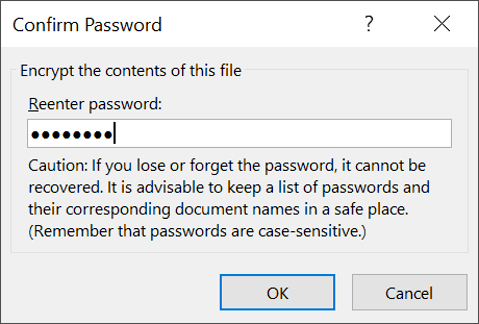
4. Type, then re-type a secure password pressing « each time.
5. Protect a document by restricting editing
Rather than using blanket password protection, a more flexible way of allowing different people to work on the document but with particular restrictions applied is to use the Restrict Editing option.
1. Select the File tab and click Info on the left side panel, if necessary.
2. Click the Protect Document button.
3. Select Restrict Editing.
The Restrict Editing side bar is displayed where you can apply formatting or editing restrictions.
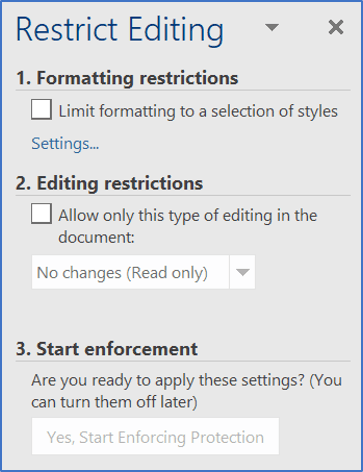
a) Restrict the FORMATTING:
1. Tick the Limit formatting to a selection of styles box.
2. Click the small blue Settings link, just below the tick box.
The Formatting Restrictions dialog box is displayed. All the styles available in the current document are listed. These include standard and custom styles
3. Tick the styles that you would like users to be able to use.
4. Untick any styles that you do not want users to use.
5. Tick Allow Autoformat to override formatting restrictions to allow the table styles to be used.
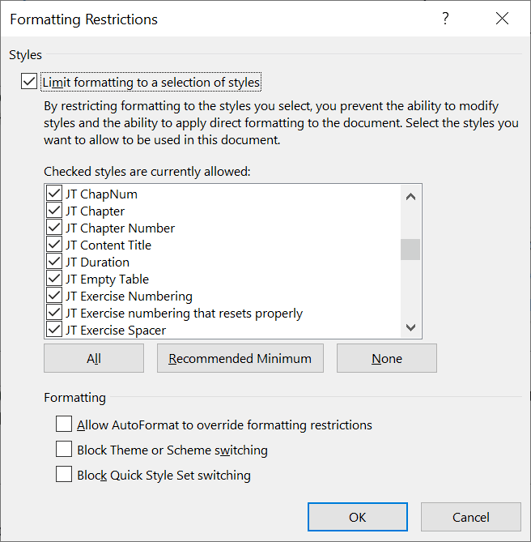
6. Tick Block Theme or Scheme switching to restrict users to the current document theme, colour scheme and font scheme settings.
7. Tick Block Quick Style Set switching to restrict users to only being able to use the current Quick Style Set.
b) Restrict the EDITING:
1. Tick the Allow only this type of editing in the document tick box.
The drop-down box beneath the tick box is now active.
2. In the drop-down box, choose
■ Tracked changes
■ Comments or
■ Filling in forms.
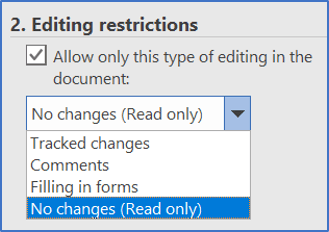
3. For a blanket editing restriction, choose No changes (Read only).
c) Specify exceptions
A second section called Exceptions also opens up when the editing is restricted. There is a single default entry called Everyone.
To add exceptions for particular users or groups (to give them a free pass where everyone else is restricted):
1. Click More users...
2. Type the user name(s) separated by semicolons
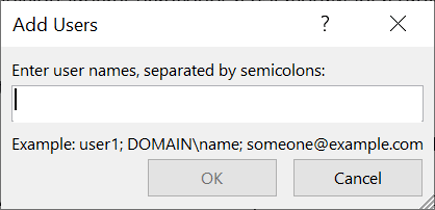
Users and user groups are controlled by your IT administration. It works the same as the global address list in Outlook.
d) Activate the restrictions
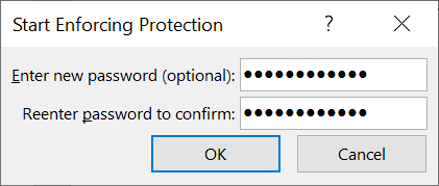
1. Click Yes, Start Enforcing Protection in section 3 of the Restrict Editing sidebar.
2. Enter and re-enter a password then press Enter to prevent anybody who is not privy to the password from changing the editing and formatting restrictions
Restricted regions for a user will be highlighted and shown in square brackets

e) Revoke access
To revoke access for a user or group:
1. Click the drop-down arrow next to the user/group name
2. Choose Remove all editing permissions for this user.
For a user to find what parts of the document they can access:
3. Select the File tab and click Info on the left side panel, if necessary.
4. Click the Protect Document button.
5. Select Restrict Editing.
6. On the Restrict Editing sidebar, click the drop-down arrow next to the user name listed under Exceptions.
7. Choose one of the three options offered (shown here on right)

6. Protect a document with a digital signature
Digital signatures have been around for several years. They must be purchased from a verified Microsoft partner, but they serve a number of useful functions:
To get a digital signature for a document:
1. Select the File tab and click Info on the left side panel, if necessary.
2. Click the Protect Document icon.
3. Select Add a Digital Signature.
4. A message pops up asking if you would like to get a digital signature from a verified Microsoft partner.
5. Choose Yes.
Word will then open a browser window and take you to a page on the Microsoft website, listing the services of some reputable digital signature providers.

6. Click the links, read the info and choose a provider.
7. Key takeaways
I hope this has opened your eyes, given you a few ideas and made you aware of how vulnerable you could be, but also given you hope and some measures you can take to protect yourself.
I hope you found plenty of value in this post. I'd love to hear your biggest takeaway in the comments below together with any questions you may have.
Have a fantastic day.


About the author
Jason Morrell
Jason Morrell is a professional trainer, consultant and course creator who lives on the glorious Gold Coast in Queensland, Australia.
He helps people of all levels unleash and leverage the power contained within Microsoft Office by delivering training, troubleshooting services and taking on client projects. He loves to simplify tricky concepts and provide helpful, proven, actionable advice that can be implemented for quick results.
Purely for amusement he sometimes talks about himself in the third person.
SHARE


Hi there. I like this article very much – clear, good language, no ambiguity, well formatted, comprehensive. I was hitherto entirely unaware of the ability to restrict editing, particularly with respect to styles – that’s the single biggest take-away for me. I am intrigued to learn that digital signature have to be purchased, because they’re already included in Acrobat. Again, thanks for this quality article.
Thanks Jonathan. It sounds like time well spent!