In this post you'll discover three essential skills that you'll need as you start developing your own spreadsheets.
1. How to resize your row(s) or column(s).
2. How to insert additional row(s) or column(s).
3. How to delete row(s) or column(s) that are no longer needed.
1. Resize one row or one column
There are a number of ways to resize a row or column.
METHOD 1 – Resize by value
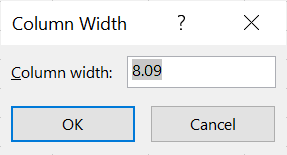
1. Right-click the grey block showing the column label or row label (e.g. A, B, C, 1, 2, 3 etc. then select Column Width.
2. In the dialog, enter your column width and click OK

METHOD 2 – Resize by click-and-drag
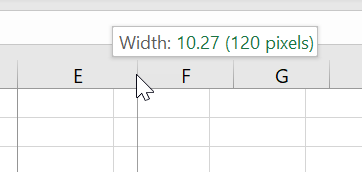
1. Move the mouse pointer over the division between two column or row selectors. The pointer will change to a black cross with arrowheads.
2. Click and drag to the appropriate size. The height or width value appears in a screen tip.

METHOD 3 – Resize to Best Fit
1. Move the mouse pointer over the division between two column or row selectors, then double-click. This resizes to the widest contents of the column or the tallest contents of a row.
If you see ####### in your cell, it is not an error. It just means that the column is not wide enough. Widen the column and the hashes disappear.
2. Resize multiple rows or multiple columns
To resize two or more rows / columns simultaneously, rather than one at a time:
1. Highlight all rows or columns to be resized.
2. Click and drag the divider between any of your selected rows or columns as described above. This sets all the rows to the same height or all the columns to the same width, or ….
… double-click the divider between any of your selected rows or columns as described above. This best-fits each individual column or row.
3. Insert extra row(s) or column(s)
To insert one row / column:
1. Place the cursor in a cell or select a row or column.
2. Select the Home tab, if necessary.
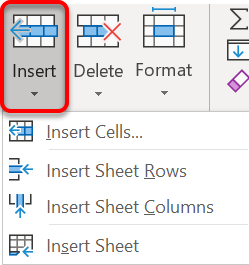
3. In the Cells group, click the Insert icon (pictured right).
4. Choose Insert Sheet Rows or Insert Sheet Columns, as appropriate.
A new row is placed above the current row.
A new column is placed to the left of the current column.

To insert more than one row or column in one hit:
1. Select the number of rows or columns you want to insert.
2. Choose the Insert icon, as described previously.
4. Delete row(s) or column(s)
1. Select the row(s) or column(s) you wish to delete.
2. Right-click any selected cell and choose Delete,
or click the Delete icon on the Home ribbon.
5. Key Takeaways
I hope you found plenty of value in this post. I'd love to hear your biggest takeaway in the comments below together with any questions you may have.
Have a fantastic day.


About the author
Jason Morrell
Jason Morrell is a professional trainer, consultant and course creator who lives on the glorious Gold Coast in Queensland, Australia.
He helps people of all levels unleash and leverage the power contained within Microsoft Office by delivering training, troubleshooting services and taking on client projects. He loves to simplify tricky concepts and provide helpful, proven, actionable advice that can be implemented for quick results.
Purely for amusement he sometimes talks about himself in the third person.
SHARE

