In this post you'll discover 2 ways to share workbooks, using the legacy Share tool and the new Co-Author tool.
1. Co-authoring - the new way to share workbooks
Co-authoring is a way for multiple people to open and work on the same workbook at the same time and see each other's changes almost instantly. Co-authoring utilises the cloud and has replaced the old Share Workbooks feature.
Here are some things to be aware of:
2. How to share workbooks using co-authoring
1. Save your workbook to a cloud location (OneDrive or a SharePoint Online library).
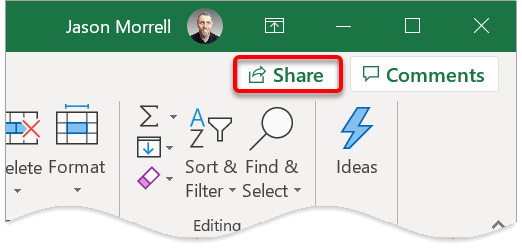
2. Click Share in the top-right corner of the Excel screen.
3. Alternatively, select the File tab then click Share on the left sidebar, then click Share with People, then Share with People again.
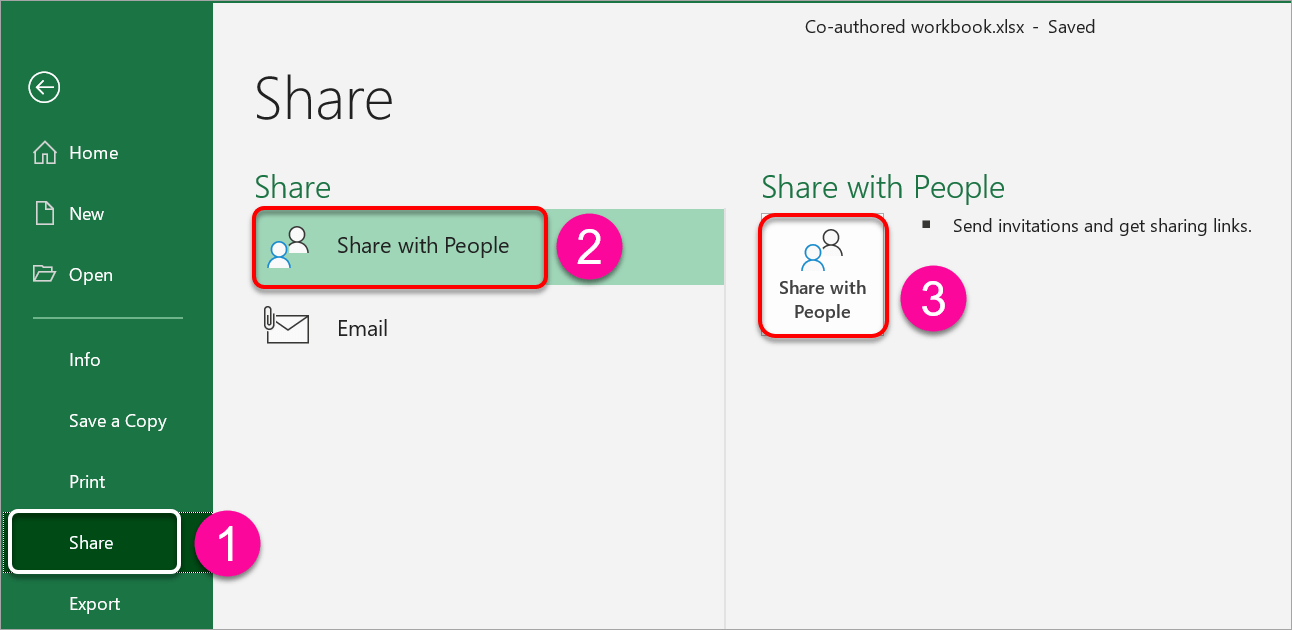
Either way, you'll see the Share sidebar on the main Excel screen.
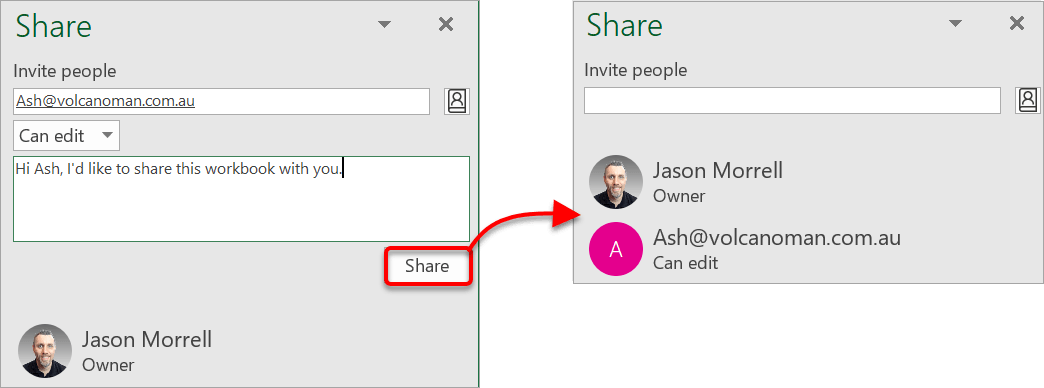
4. In the Share sidebar, type an email address or a number of email addresses separated by a semicolon ( ; ) choose whether they can edit or view the workbook, add a short message if you want, then click Share.
The invitation is sent and the sidebar now shows who has shared access to the workbook.
If you want to manually send a link to the file:
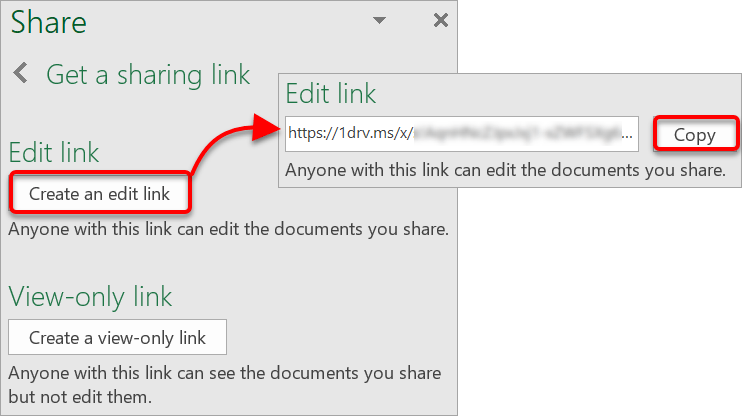
1. Click Get a sharing link at the bottom of the Share sidebar.
2. Click either the Create an edit link button or the Create a view-only link button.
3. When the special link is displayed, click the button then paste the link into an email.
3. Managing co-authored workbooks
To remove a user:
To change the permissions of a user (view or edit)"
To open a shared workbook from an email invitation:
1. Click the link in the email to open the workbook. A web browser will open, and the workbook will open in Excel for the web.
2. If you have an active subscription, click Edit in Desktop App to edit using the full feature set.
To open a shared workbook from the Excel Desktop app:
1. Open the file from the cloud location as you would for any other workbook. Alternatively, select the File tab, then Open, then Shared with Me.
2. A yellow bar may appear that states that the file is in Protected View. Click the Enable Editing button.
4. Legacy tool: Share workbooks
Up until Excel 2019, workbooks were locked when opened but could be shared which meant that multiple people could make changes to the same spreadsheet at the same time. Well, not exactly the same time, because potential conflicts could occur if two people change the same thing at the same time. This was controlled with some simple rules which controlled which change was applied?.
Tracking changes was also part of the Sharing feature but is now a legacy tool.
When you attempted to open a locked workbook, a message was displayed offering 3 choices:
Because Sharing Workbooks is now a legacy feature, it has been removed from the Review ribbon and you must customise the Quick Access Toolbar (QAT) in order to access it. There is a separate chapter covering this.
1. Select the File tab and choose Options at the bottom of the left sidebar.
2. On the Options dialog, select Quick Access Toolbar on the left sidebar.
3. Select All Commands or Commands not in the ribbon from the Choose commands from list.
4. Select Share Workbook (Legacy) and click Add.
5. If you need it, you can also select Track Changes (Legacy), Protect Sharing (Legacy) and Compare and Merge Workbooks and click Add for each one.
6. Click OK to close the options dialog. The new icons are on the Quick Access Toolbar.
5. Allowing a workbook to be shared
To enable the workbook to be shared:
1. Click the Share Workbook icon on the Quick Access Toolbar.
2. Click the Editing tab, if necessary.
If sharing has previously been enabled for the workbook then all users who are currently using the workbook are listed. If it is not currently shared, it will show you as the exclusive user.
3. Tick the box labelled Use the old shared workbooks feature instead of the new co-authoring experience.
This enables the workbook to be shared and also activates the Advanced tab.
The Advanced Tab is where updates to the workbook are controlled and the rules regarding conflicts are established.
1. Click the Advanced tab.
If someone has been nominated as the owner of the workbook, it is wise to activate tracking. This records any changes that are made and allows the owner to override any changes that have been made
2. Specify when changes should be updated.
You can either update the workbook when you save or allow Excel to save any updates periodically (e.g. every 10 minutes).
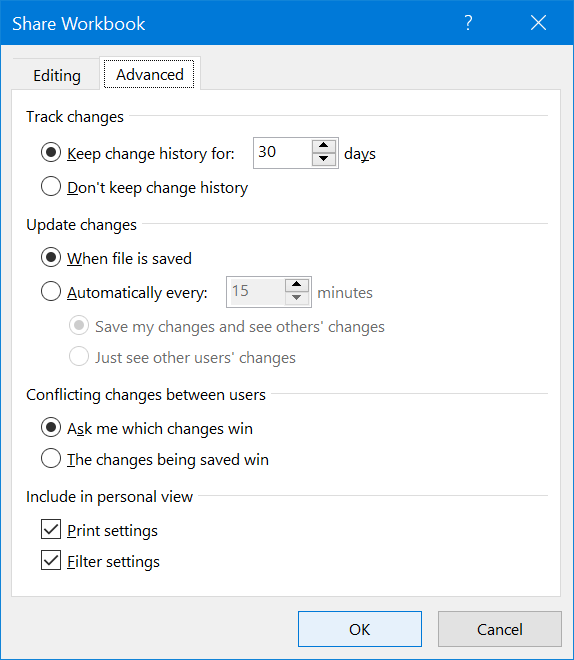
3. The bottom section of the dialog box is the most important. Specify what action should be taken when two users change (and save) the same cell(s) concurrently.
4. Click Ok when you have chosen the sharing behaviours.
5. Workbooks that are shared display [Shared] after the worksheet name on the title bar.
6. Tracking changes made to a workbook
Depending on the sensitivity of the data, it may be a good idea to track any changes made. This includes anything you add, change or delete is recorded, and your name is associated with the change.
To switch on the Track Changes feature:
1. Click the Track Changes icon on the Quick Access Toolbar, then Highlight Changes.
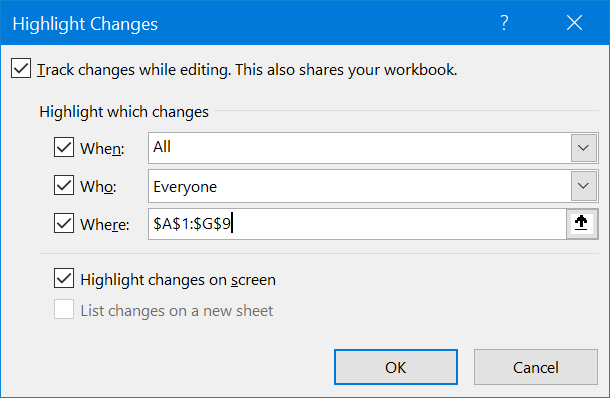
2. Choose when you want changed tracked from The choices are:
3. Select who you want to track changes for. The choices are:
4. Select where (a specific cell range) you want to track or leave the box empty to track changes for the whole workbook.
5. Choose whether to Highlight changes on the screen and/or list changes on a new sheet, so they can be reviewed later.
6. Click OK.
7. Save the workbook when prompted to do so.
Changes are now tracked.

When you are ready to finalise changes, you will need to decide whether to accept or reject each change.
Here’s how:
1. Click the Track Changes icon on the Quick Access Toolbar, then Accept/Reject Changes.
2. Click OK when yo are prompted to save the workbook.

3. Filter the changes you want to check by setting the When, Who and Where options, then click OK
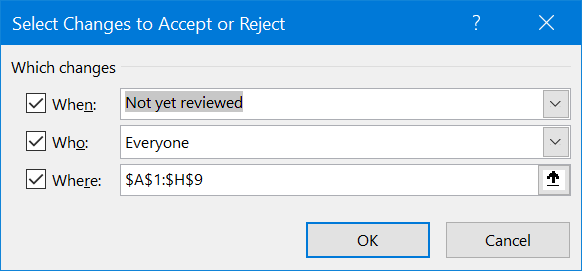
All the changes that match your criteria are listed, one at a time.
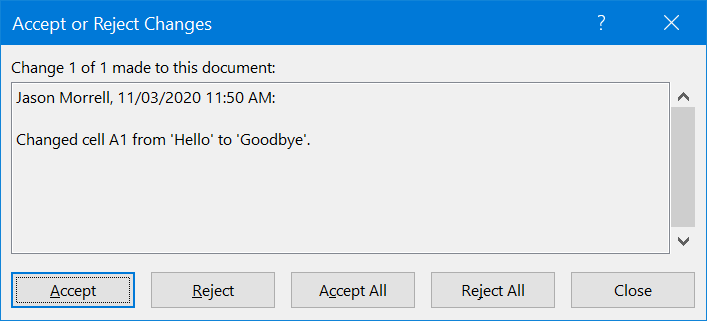
4. For each change choose Accept, Accept All, Reject or Reject All
If more than one change has been made to a cell, all the changes for the cell will be listed and you can choose which one to Accept.
7. Key Takeaways
I hope you found plenty of value in this post. I'd love to hear your biggest takeaway in the comments below together with any questions you may have.
Have a fantastic day.


About the author
Jason Morrell
Jason Morrell is a professional trainer, consultant and course creator who lives on the glorious Gold Coast in Queensland, Australia.
He helps people of all levels unleash and leverage the power contained within Microsoft Office by delivering training, troubleshooting services and taking on client projects. He loves to simplify tricky concepts and provide helpful, proven, actionable advice that can be implemented for quick results.
Purely for amusement he sometimes talks about himself in the third person.
SHARE

