In this post you'll discover how to caption your images (manually or automatically) and then consolidate your captions into a Table of Figures.
You can also caption tables to create a Table of Tables or caption equations to create a Table of Equations, using the same method.
This is part 2 of a 3-part series.
RELATED POST:
Part 1: How to build a Table of Contents in Word
RELATED POST:
Part 3: How to build a Table of Authorities in Word
1. How to manually caption images
A large document will contain a mixture of text, tables, images, and possibly equations if you work in the mathematics field.
It is good to create a second table after your TOC, that lists all the tables or all the figures in the document. To achieve this there are two main steps:
1. Select the image, table or equation
2. Select the References tab
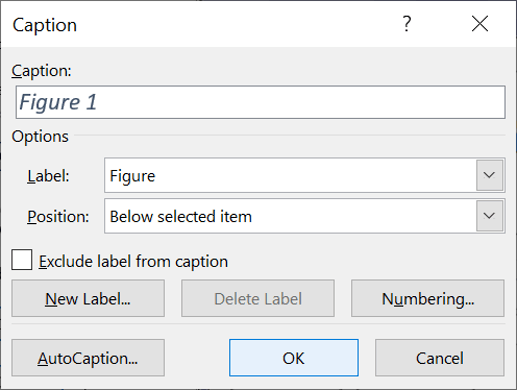
3. Click the Insert Caption icon in the Captions group

4. In the Label drop-down list, choose the type of object you have selected (Equation, Figure or Table).
5. Choose whether to position the label above or below the item

6. Click the Numbering... button
7. Select a numbering style (1, 2, 3 or a, b, c etc.).
8. Choose a separator (hyphen, dot etc.)
9. If you require multi-level caption numbering
a) tick the Include Chapter Number box.
b) in the Chapter starts with style box, select Heading 1, Heading 2, Heading 3 etc.
If you choose Heading 1, your caption will say Figure 1-A
If you choose Heading 2, your caption will say Figure 1.1-A
If you choose Heading 3, your caption will say Figure 1.1.1-A
10. Click OK.

11. Add a suitable description to the caption at the top.
12. Click OK
2. How to automatically caption images
To save you a lot of time an effort, you can use the AutoCaption feature. This will automatically label each image or table you insert into the document.
However, it is not clever enough to add the description too, so you will need to go through afterwards and add these yourself.
To switch on the AutoCaption:
1. Select the References tab.
2. Click the Insert Caption icon in the Captions group.
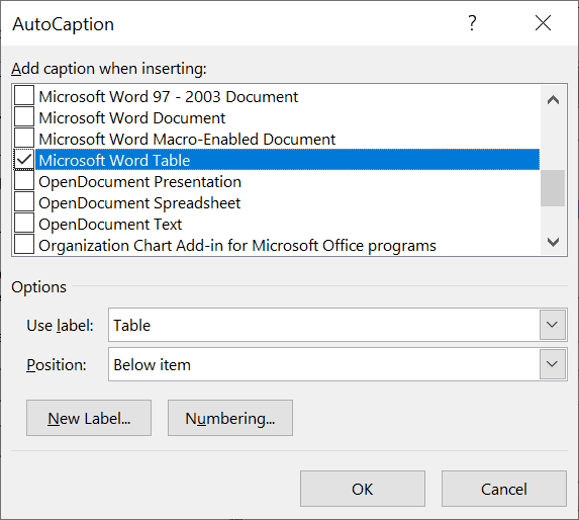
3. Click the AutoCaption... button.
4. Tick the type of items you want to label, e.g. Microsoft Word Table.
5. Choose a label type and position.

6. Click OK
7. Click OK again
3. How to create the table of figures
A table of figures could be a table of images. a table of tables or a table of equations. Each one is independent of the others.
To produce a table of figures:
1. Position the cursor at the point you want to insert the Table of Figures.
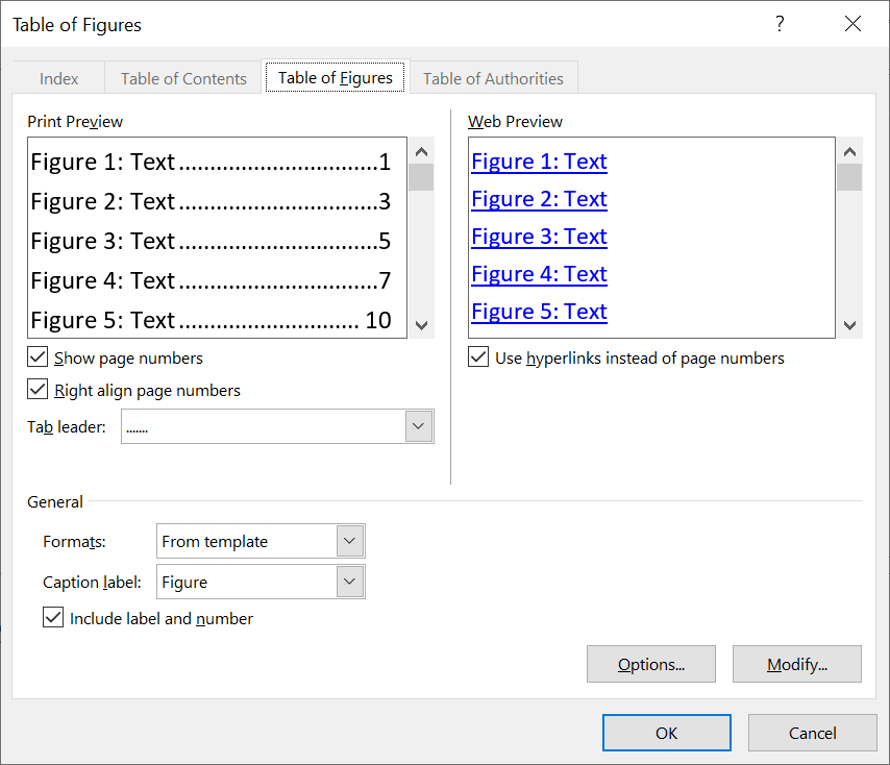
4. In the Caption Label drop-down list, choose the type of item you want to generate a list for (e.g. figures or tables).
2. Select the References tab.
3. Click the Insert Table of Figures icon in the Captions group.
The Table of Figures dialog box is displayed.
5. Change the remaining options in the dialog box as you did for TOC.

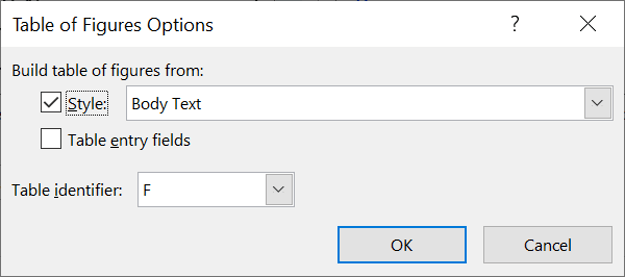
6. Click the Options... button. The dialog box is a much-simplified version of the TOC equivalent.

7. When creating captions using the method described above, hidden TC field codes (with an f switch) are inserted into the document and these are used to generate the table of figures.
4. The key points
RELATED POST:
2 ways to build a dynamic Index page in Word
I hope you found plenty of value in this post. I'd love to hear your biggest takeaway in the comments below together with any questions you may have.
Have a fantastic day.


About the author
Jason Morrell
Jason Morrell is a professional trainer, consultant and course creator who lives on the glorious Gold Coast in Queensland, Australia.
He helps people of all levels unleash and leverage the power contained within Microsoft Office by delivering training, troubleshooting services and taking on client projects. He loves to simplify tricky concepts and provide helpful, proven, actionable advice that can be implemented for quick results.
Purely for amusement he sometimes talks about himself in the third person.
SHARE

