Table of Contents, Figs & Auths
In this post you'll discover how easy it is to create a table of contents for your document.
One that you don't have to type by hand.
One that you don’t have to spend time changing when your document changes.
This table of contents will pick up key headings from within your document and build the table of contents for you. And the best part? You can update it any time with one keypress or 2 clicks.
This is the first of a 3-part series
RELATED POST:
Part 2: How to build a Table of Figures
RELATED POST:
Part 3: How to build a Table of Authorities
1. Why are Tables of Contents so important?
As your document becomes larger, you need to provide the reader with some tools to help them find their way around the document.
The most obvious tool is the Table of Contents (herein referred to as TOC).
2. How to create a Table of Contents in 3 clicks
Assuming your document utilises the built-in Heading 1, Heading 2 and Heading 3 styles, position the cursor where you want to place your TOC, then ...
1. Select the References tab.
2. Click the Table of Contents icon in the Table of Contents group.
3. Choose a pre-set TOC design from the list provided. That's it!
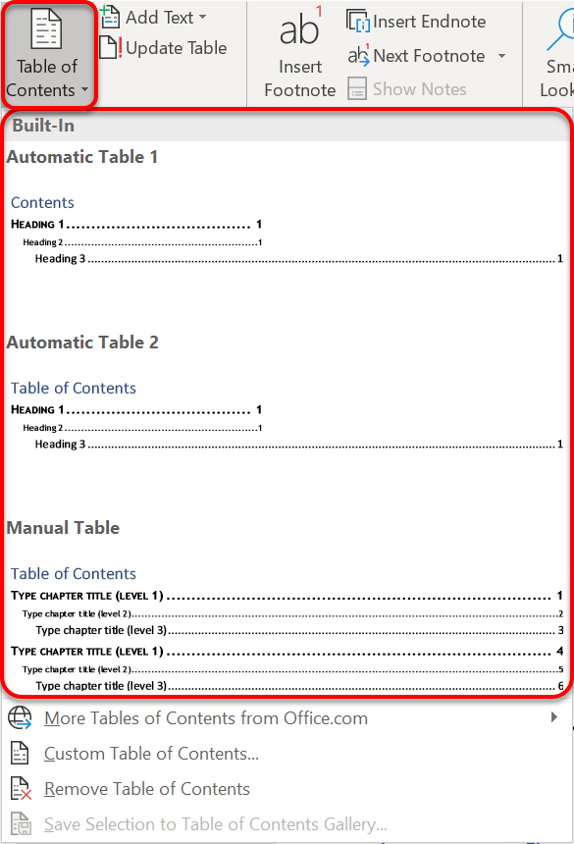
A table of contents is created based on your Heading 1 / 2 / 3 entries throughout the document.

3. How to create your own custom Table of Contents
1. Position the cursor where the TOC will be inserted.
2. Select the References tab.
3. Click the Table of Contents icon in the Table of Contents group.
4. Click Custom Table of Contents at the bottom of the list.
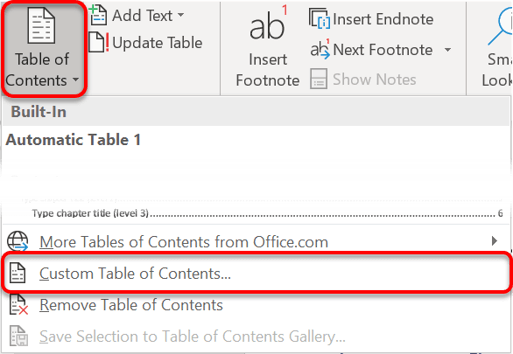
The Index and Tables dialog box is displayed. This box provides the tools to customise the table of contents.
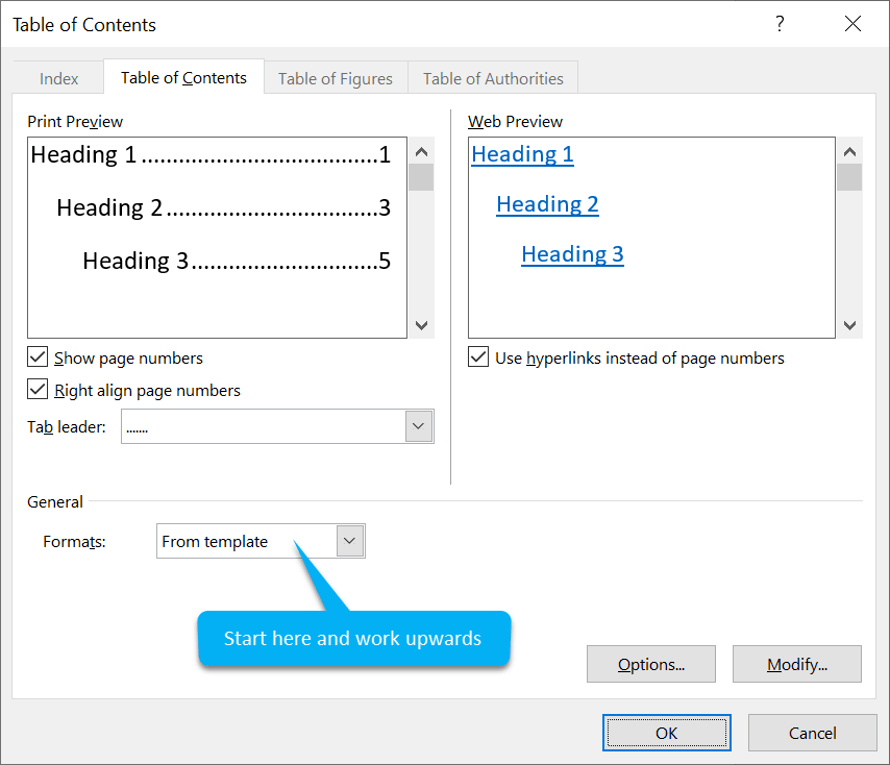
It’s actually easiest to start at the bottom-left and work your way up.
If you go top-to-bottom, then when you select an option from the Formats, dropdown list, all the settings above it will be overwritten.
This is how to select your options:
1. Choose a general format from the Formats drop-down list.
The Print Preview box at the top-left of the dialog box provides an indication of how the table of contents will look.
The default is From Template. Each format sets a particular combination of settings in the other options, like page numbers and tab leaders.
2. Printed documents require page numbers, so ensure that the Show Page Numbers box is ticked.
For documents that are viewed online you may want to remove the page numbers from the contents and just let the user click to navigate.
3. Page numbers that are right-aligned look the best, so ensure that the Right align page numbers box is ticked.
4. The tab leader joins the item of content to the page number. The dotted tab leader works best in most situations.
To modify or remove the tab leader select an option from the Tab leader drop-down list
5. Check the preview to make sure everything looks okay, then click OK
4. How to create a Table of Contents using your own styles
There are many advantages to using the standard Heading 1, Heading 2 and Heading 3 styles.
However, some people have good reasons for using their own styles. In this situation, it is necessary to tell Word to use these styles instead of the standard styles.
You can use any styles you have created to identify the content you want to include in the Table of Contents.
1. Position the cursor where the TOC will be inserted.
2. Select the References tab.
3. Click the Table of Contents icon in the Table of Contents group
4. Click Custom
Table of Contents at the bottom of the list
The Table of Contents dialog provides all the tools you need to customise the table of contents.
5. Click the Options... button. The Table of Contents Options dialog box is displayed,
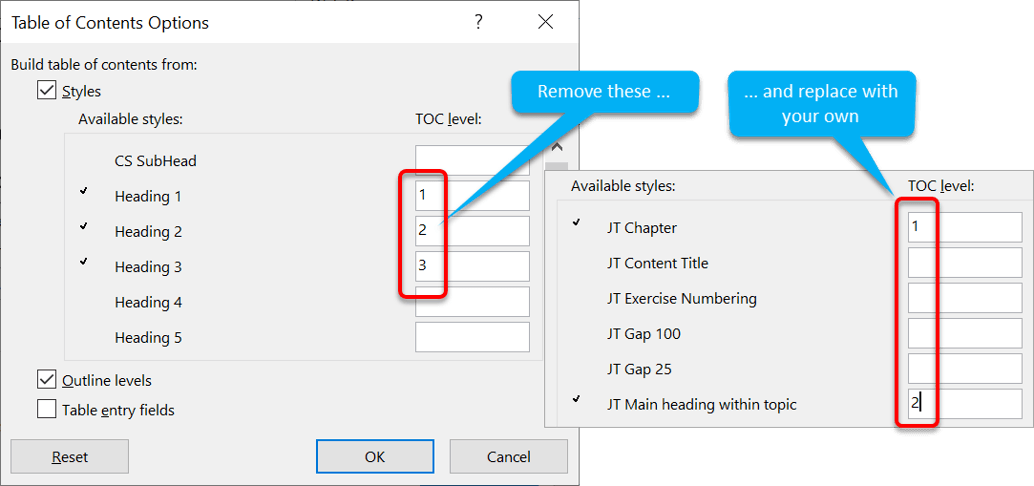
6. Ensure that the Styles box is ticked.
7. Delete the entry from the TOC level box for Heading 1.
8. Repeat for Heading 2 and Heading 3.
9. Find the style name for your top-level heading.
10. Type a ‘1’ in the TOC level box.
11. Find the style for the next level heading.
12. Type a ‘2’ in the TOC level box.
13. Repeat for your next level heading style, if necessary.
14. Click OK twice to close the dialogs.
5. How to use the TOC to navigate the document
Every item in a TOC is an active hyperlink with a safety mechanism. If you hover over any item, you will see a screen-tip indicating the destination of the link.
Hold down Ctrl and click the TOC entry.

6. How to update the Table of Contents
The contents of a document change continuously. Content gets added, removed, changed or moved. Thankfully, you can refresh the table of contents rather than set it up from scratch every time.
To update the TOC:
1. Position the cursor anywhere in the TOC.
2. Press F9. This is the refresh key. If that doesn't work, press Fn F9. Alternatively, right-click in the TOC and choose Update Field.
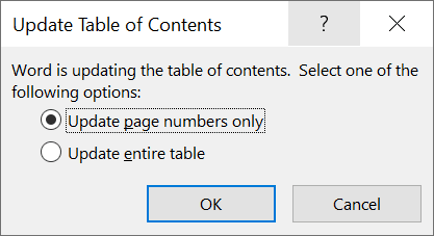
There are two types of update. You can choose to Update the page numbers, which is handy if the sections have expanded but the structure remains the same.
Alternatively, you can choose to Update entire table, which will regenerate the whole TOC and pick up new headings, remove sections that have been deleted etc., as well as insert all the current page numbers.
Personally, I choose the second option every time.
7. How to edit the Table of Contents options
You have to be a little bit careful here. The Table of Contents is made up of 2 levels of fields.
The top level contains the { TOC } field.
But the second level contains a { HYPERLINK } field that allows you to jump to that section when you hold Ctrl and click the item.
1. Hover the mouse pointer in the left margin in line with the top of the table of contents.
2. Left-click and drag down to select the entire table of contents making sure to pick up the paragraph marker at the end. If you don't, the next step won't work.
3. Right-click anywhere on the selected text
4. Choose Edit Field from the context menu.
5. Click the Table of Contents button. You will be returned to the TOC dialog box.
6. Make your changes
7. Click OK
8. How to customise the design of the table of contents
When you create a TOC, the ‘look’ is determined by a set of styles called TOC 1, TOC 2 ... etc.
To change the design of a TOC style:
1. Select the Home tab.
2. Click the launcher in the bottom-right corner of the Styles group to display the styles pane.
3. Scroll through the styles pane until you find the required TOC style, then right-click it and choose Modify.
4. Make your changes and click OK.
9. How to create a TOC to view on the web
Many documents these days are not designed to be printed, but rather to be viewed on a company intranet.
Web documents are used differently to printed documents. Viewers do not read a document sequentially but click on hyperlinks to navigate from one spot to the next.
To create a TOC for the web-based document
1. Position the cursor where the TOC will be inserted.
2. Select the References tab.
3. Click the Table of Contents icon in the Table of Contents group.
4. Click Custom Table of Contents at the bottom of the list.
5. Set up the TOC as described previously but focus instead on the Web Preview window. Ensure that the Use hyperlinks instead of page numbers box is ticked.
6. Click OK.
To convert the document to an online document:
1. Select the File tab, choose Save As then Browse.
2. Change the Save As Type to Web Page.
3. Click the Change Title button and give the web page a title.
4. Type a filename and choose where to store it.
5. Click the button.
6. Upload the HTML document to the intranet or internet site (in most cases this will be handled by the web administrator, so just email him or her the web document).
10. The key points
RELATED POST:
2 ways to build a dynamic Index page in Word
I hope you found plenty of value in this post. I'd love to hear your biggest takeaway in the comments below together with any questions you may have.
Have a fantastic day.


About the author
Jason Morrell
Jason Morrell is a professional trainer, consultant and course creator who lives on the glorious Gold Coast in Queensland, Australia.
He helps people of all levels unleash and leverage the power contained within Microsoft Office by delivering training, troubleshooting services and taking on client projects. He loves to simplify tricky concepts and provide helpful, proven, actionable advice that can be implemented for quick results.
Purely for amusement he sometimes talks about himself in the third person.
SHARE

