Have you ever wondered how to display dates in a way other than the standard dd/mm/yyyy format?
What about Wednesday, 2 December 2020?
Or just December 2020?
In addition to the standard date formats, you can create your own custom date formats to fit the purpose exactly. That's what thus post is about.
1. Different ways of showing the date
When you think about the different ways you can display a date, there’s quite a few standard options. Here’s a sample:
The safest way to type a date is to use slashes (/) as separators between day, month and year. When you do this, Excel will always convert to the default date format of 02/12/2014.
If you separate with dots (.), Excel doesn’t know what to do. Excel’s primary purpose is to crunch numbers and it thinks you have entered 2 decimal points
The results?
Excel converts your date to text. Which is okay if you simply want to display the date, but if you need it for a calculation, you’re out of luck.
2. Which date format is best?
That really comes down to the context in which the date is being used.
The choice is yours.
We’ll come on to how to create a custom date format in a moment but first here’s how to …
3. Choose a standard date format
1. Select the date cell(s).
2. Press CTRL 1 (to display the Format Cells dialog).
3. Click the Number tab, if necessary.
4. The Date category should already be selected.
5. Select a date format from the right hand list.

Figure 01: The Standard Date Formats
4. Custom date format: Get down with the cool kids!
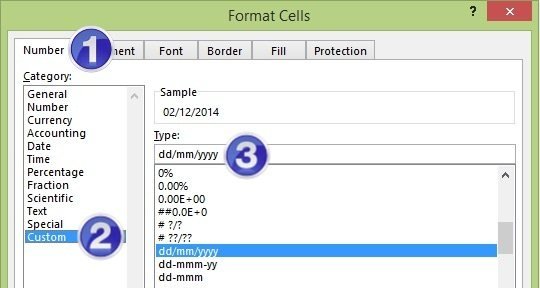
You create a custom date format by using a system of placeholders.
1. First, Select the date cell(s).
2. Press CTRL 1 (to display the Format Cells dialog).
3. Click the Number tab, if necessary.
4. Select the Custom category.
5. Enter your custom date format into the Type box, as described below.

Figure 02: Create your own custom date format using placeholders
There are 3 primary date placeholders -
but the magic happens in how you use them.
5. Placeholder Descriptions
Here’s some examples of date formats that you can create that do not appear in the regular list. All of these example use the date 2 Dec 2014.
6. Create a formula to generate a custom date format
Any of the custom date formats mentioned previously can be used within a TEXT formula to convert an existing date (in whatever existing format) to your desired format.
Say, cell A1 contains the date 20/06/2020.
In a new cell type ...
=TEXT(A1, "dddd, dd mmmm yyyy")
This results in Saturday, 20 June 2020.
You can replace the placeholders within the quotes with anything you want.
7. What next?
I hope you found plenty of value in this post. I'd love to hear your biggest takeaway in the comments below together with any questions you may have.
Have a fantastic day.


About the author
Jason Morrell
Jason Morrell is a professional trainer, consultant and course creator who lives on the glorious Gold Coast in Queensland, Australia.
He helps people of all levels unleash and leverage the power contained within Microsoft Office by delivering training, troubleshooting services and taking on client projects. He loves to simplify tricky concepts and provide helpful, proven, actionable advice that can be implemented for quick results.
Purely for amusement he sometimes talks about himself in the third person.
SHARE


Can you add a custom date format to the DATE drop down menu?
No, sorry.
To create a one-click date-formatting option, the easiest way is to record or write a short macro and attach the macro to a Quick Access Toolbar (QAT) icon.
How do I capitalize the month initials. 16Mar2021 = 16MAR2021?
Unfortunately, you cannot do this with a custom format. You have to manipulate it with a formula instead.
For example, if A1 contains your date, your formula in B1 could be =UPPER(TEXT(A1, “ddmmmyyyy”))
Sorry to be the bearer of bad news!
Thanks for this, I use the custom format to show only months in my charts that tracks the number of members in our association.
Great to hear. Thanks Ben.
Thank you for the sharing, it very helpful to my question~
No worries Hailee. I’m glad it was useful.
How to show H or S in it just as a letter not a time data?
Thanks for your question Hailee. You can include any fixed item in your custom format by prefixing it with a backslash (\). For example to show 12:30 as 12H:30M use the custom format hh\H:mm\M. All the best. Jason