1. Quick visual separators using the keyboard
Type 3 dashes ( --- ) to display a single line separator
Type 3 equals signs ( === ) to display a double line separator
Type 3 hashes ( ### ) to display a triple line separator
Type 3 underscores ( ___ ) to display a thick separator
Type 3 asterisks ( *** ) to display a dotted line separator
Type 3 tildes ( ~~~ ) to display a wavy line separator
2. Adding a paragraph border separator for lots more choice
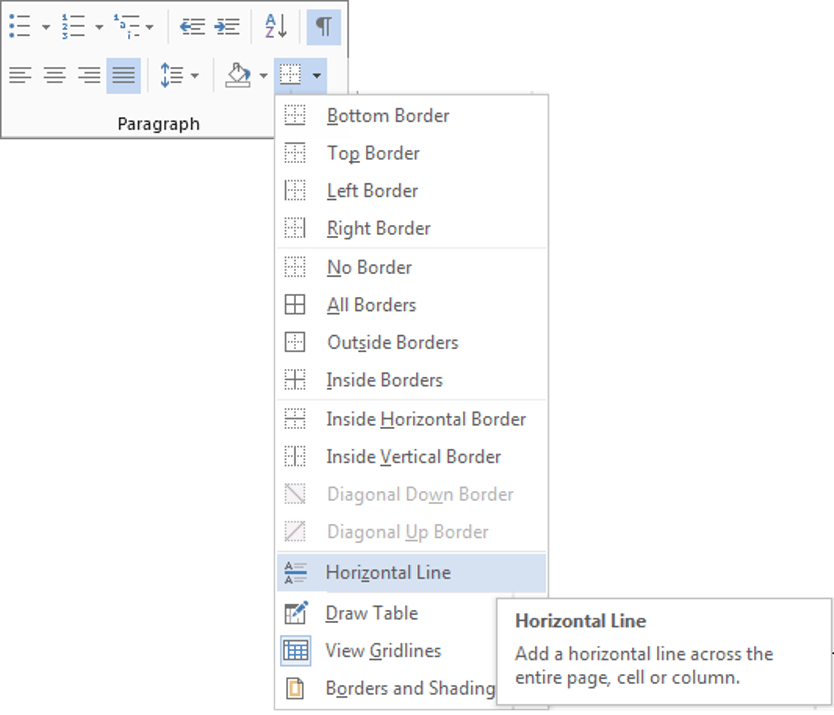
There is also a Horizontal Line tool you can use.
1. Position the cursor where the line is to be inserted.
2. Select the Home tab | Paragraph group, or
Table Tools | Design tab (if you are working with a table).
3. Click the drop-down arrow on the Border icon.
4. Select Horizontal Line.

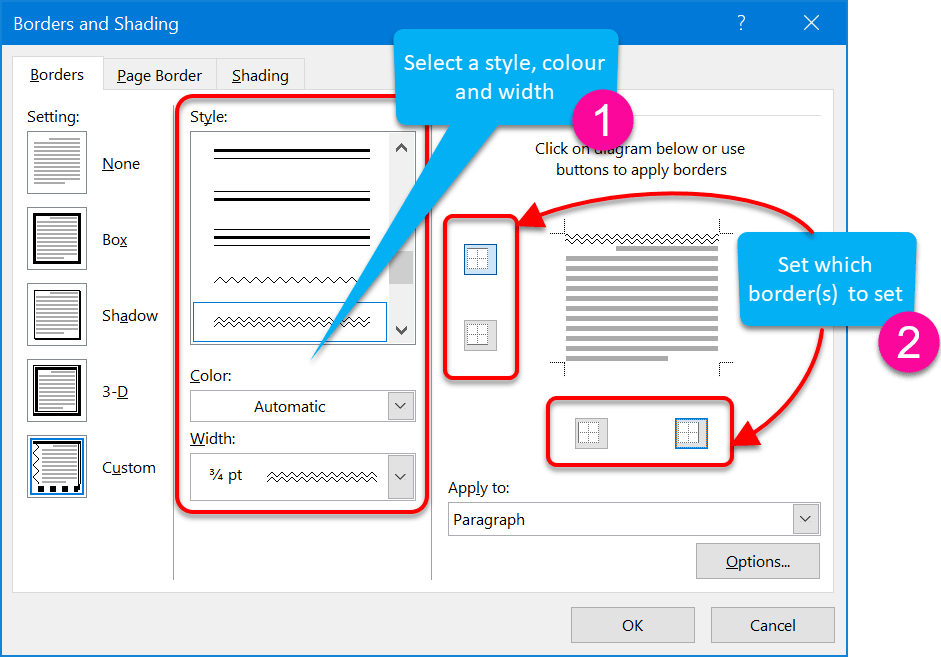
5. For more choices, click Borders and Shading instead of Horizontal LIne.
6. Choose a line style, line colour and line width.
7. Click the border icons around the preview so that only the top or bottom icon is on.

And that, my friend, is how you add some visual interest to an otherwise dull-looking document.
Here are some other advanced text effects you may be interested in.
I hope you found plenty of value in this post. I'd love to hear your biggest takeaway in the comments below together with any questions you may have.
Have a fantastic day.


About the author
Jason Morrell
Jason Morrell is a professional trainer, consultant and course creator who lives on the glorious Gold Coast in Queensland, Australia.
He helps people of all levels unleash and leverage the power contained within Microsoft Office by delivering training, troubleshooting services and taking on client projects. He loves to simplify tricky concepts and provide helpful, proven, actionable advice that can be implemented for quick results.
Purely for amusement he sometimes talks about himself in the third person.
SHARE


In my ms word after adding three dash and enter not coming line so help what to do
Hi Anish. Check this setting is ON.
I added a single line using the 3 dash trick. Now I can’t delete it! What easy trick am I missing?
Word is actually setting the top border for the paragraph. To remove it:
1. Select the paragraphs above and below the line.
2. Click the Border icon in the Paragraph group (Home ribbon).
3. Choose No Border.
Due to some setting Options that i clicked, now that when i press — and Enter i dont get a delimiter and now i am not able to find it. Please help.
Hi Rahul
1. Go to File | Options | Spelling & Grammar then click the Autocorrect Options button. (Or on Mac, go to Word | Preferences | Autocorrect)
2. Go to the ‘AutoFormat As You Type’ tab.
3. Ensure that the ‘Border Lines’ checkbox is checked.
All the best, Jason